Let me guess.
You’ve got a foam roller that you stuck in your closet, or maybe you see others at the gym using them—looking like they’re in some kind of agony from pain relief.
Here is the important thing: That little piece of foam may turn out to be the missing key your body has been seeking.
Studies have shown that foam rolling increases your range of motion by an astonishing 28% and reduces your subsequent muscle soreness by 40%.
But here is the problem:
Most people do it wrong—really, really wrong—and they’re shortchanging themselves on some massive benefits that proper foam rolling can provide.
Today’s tutorial will cover the following:
- What is foam rolling?
- How does foam rolling work?
- Science-Backed Benefits
- Best Foam Rolling Exercises: How to Do Them Right
- Very common mistakes that sabotage your results—and how you can fix them.
In addition, I will show you the same foam rolling routine that keeps me loose and pain-free, even though I am at my desk for 10+ hours a day.
- What is a Foam Roller?
- How Does Foam Rolling Work
- The Science Behind the Relief
- 20 Best Foam Roller Exercises
- 1. Chest Foam Roll
- 2. Chest Opener Foam Roll
- 3. Side Shoulder Foam Roll
- 4. Front Shoulder Roll
- 5. Thoracic Spine Foam Roll
- 6. Foam Roller Thoracic Spine Extension
- 7. Lats Foam Roll
- 8. Biceps Foam Roll
- 9. Triceps Foam Roll
- 10. Foam Roll Neck
- 11. Hamstring Foam Roll
- 12. Quad Foam Rolling
- 13. Foam Roll Adductors
- 14. Glute Foam Roll
- 15. Calf Foam Roll
- 16. Iliotibial Band (IT Band) Foam Rolling
- 17. Shin Foam Roll
- 18. Foam Rolling for Plantar Fasciitis
- Takeaways
- Reference
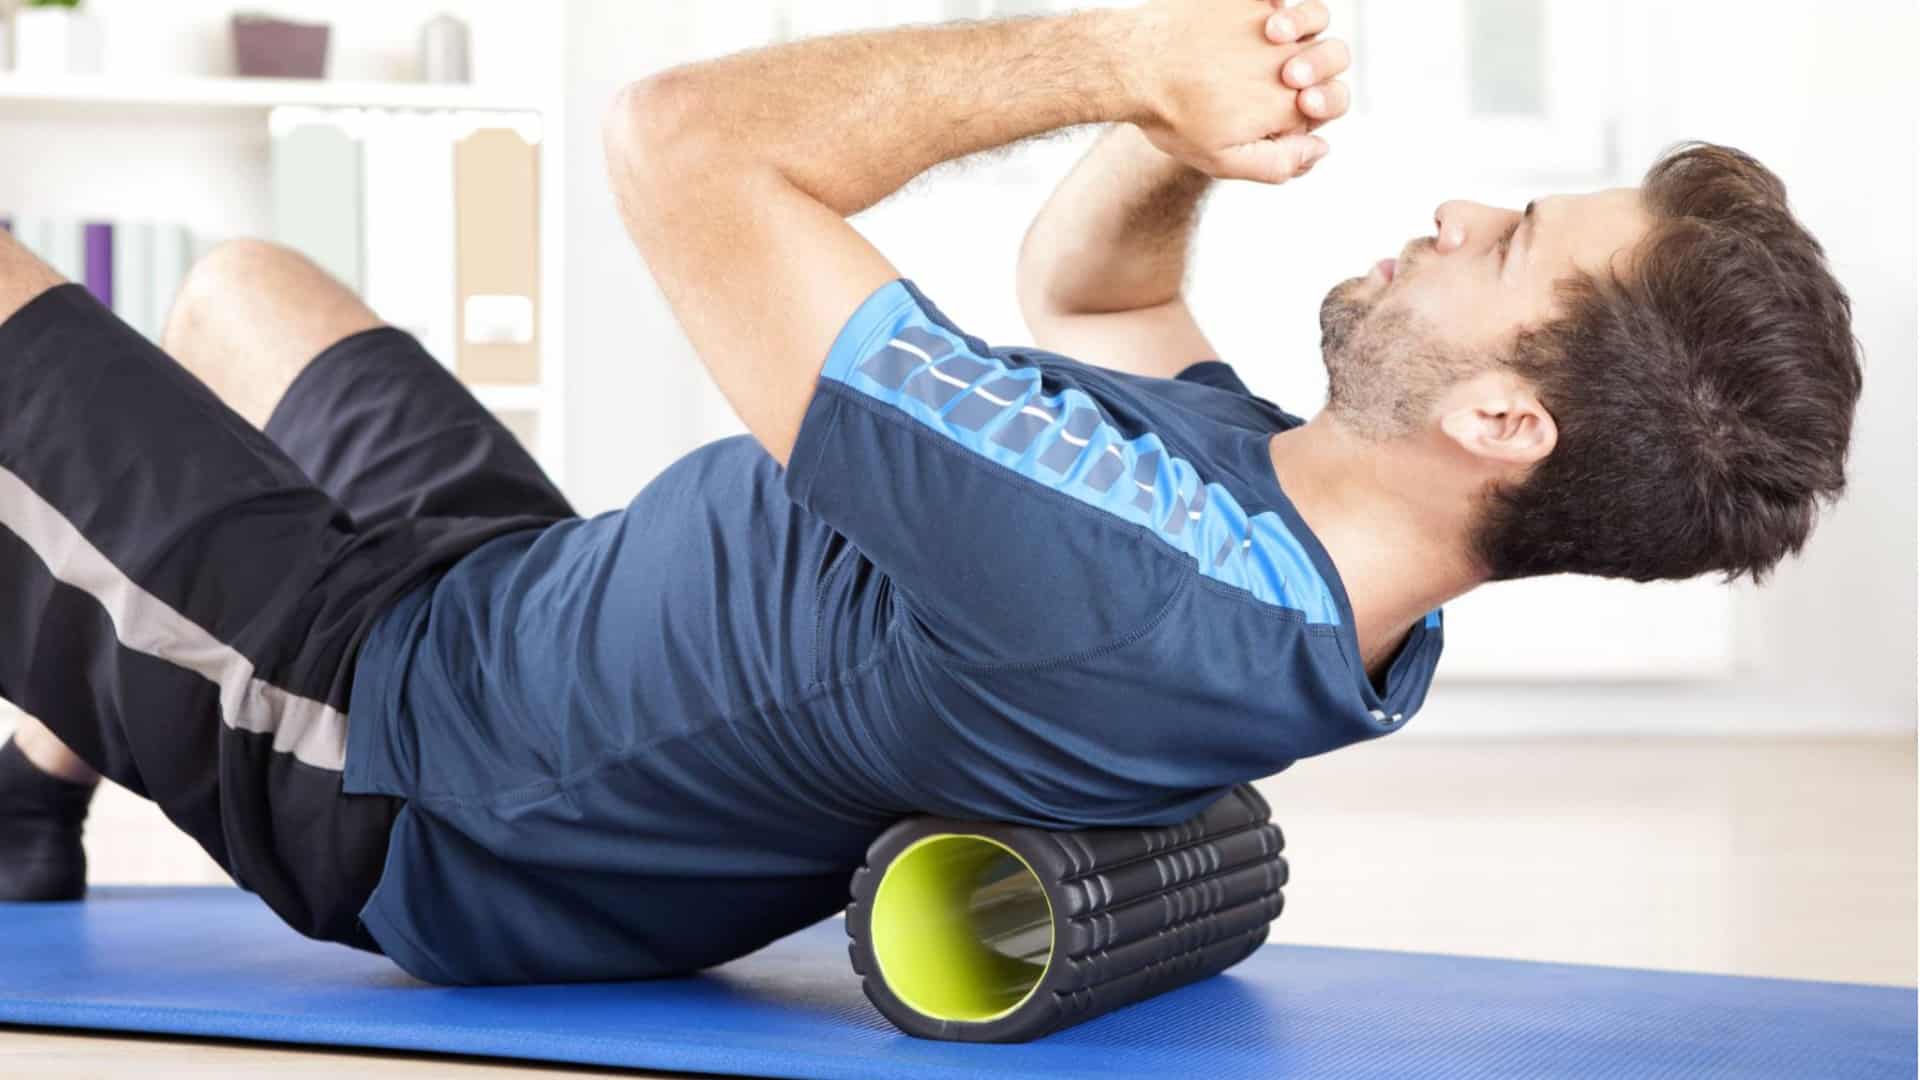
What is a Foam Roller?
Think of a foam roller as your personal massage therapist—except it costs less and is available 24/7.
At first glance, it seems deceptively simple: a cylinder of dense foam or flexible plastic. However, this humble tool is actually a powerhouse for muscle recovery and pain relief.
Here’s what makes it special: When you roll your body weight across it, the foam roller applies precise pressure on the muscles and fascia—the connective tissue wrapping around your muscles.
It’s somewhat like kneading dough, except this dough is your tight, knotted muscles.
How gorgeous is foam rolling? It’s really versatile: You can address the following through foam rolling:
- Tired, painful legs
- Tight shoulders and upper back
- Stiff hip flexors
- Cranky IT bands
- Pretty much any muscle group that needs attention
Foam rolling has become somewhat of a panacea for athletes, especially in terms of recovery and injury prevention.
You don’t have to be a marathoner to benefit from this type of myofascial release. Foam rolling can also benefit a desk warrior with computer-hunched shoulders or just someone who wants to move better.
Or better still, you are in complete control: You control the tension applied and attend to those areas that require the most attention. It’s like having a “pause” button for muscle tension that you can engage anytime.
How Does Foam Rolling Work
Ever wonder what exactly is happening when you roll out those tight muscles? Let’s break down the science—beyond the textbook jargon.
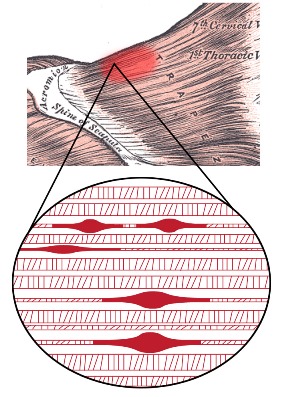
Think of your muscles as being covered in a thin, stretchy wrapper called fascia. This fascia slides smoothly when healthy, allowing your muscles to move without restriction. The problem happens when it gummed due to:
- Marathon sessions at your desk
- Hard training
- Old trauma
- Daily stress
These can turn your smooth, flexible fascia into a tight, knotted mess. Think of a piece of plastic wrap crumpled up. This can lead to pain and stiffness and also reduce blood flow to the affected areas.
The Science Behind the Relief
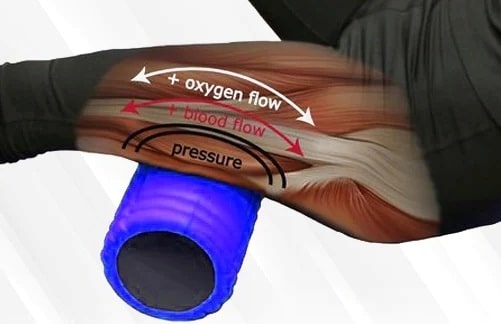
When you use a foam roller, you give yourself a deep-tissue massage. Here’s what happens:
- Pressure through rolling floods the area with fresh blood, transporting oxygen and nutrients your muscles are craving.
- Rolling sends signals to your brain saying, “Hey, it’s safe to relax here,” which helps those tight muscles finally let go.
- You know those gnarly knots in your fascia? Rolling helps break those up and restores smooth motion.
Research supports this: foam rolling can reduce delayed-onset muscle soreness (DOMS) and improve recovery after workouts.
When you improve the function of your fascia, your body can move much better and without as much pain. It’s like ironing the wrinkles out of your body’s internal packaging. The result is better movement, less pain, and faster recovery.
20 Best Foam Roller Exercises
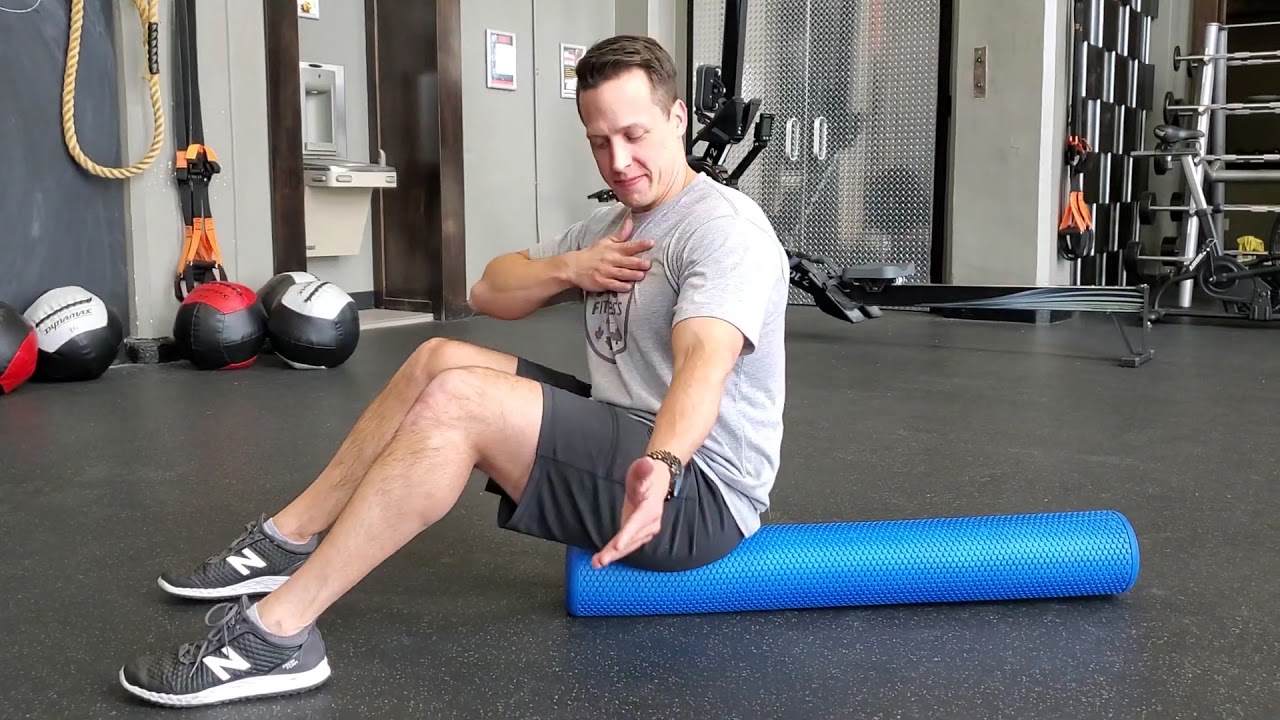
1. Chest Foam Roll
Ever notice how your chest feels tight after a long day at the computer? Or maybe your shoulders are rolling forward like a caveman? Here’s a game-changer most people miss: foam rolling your chest.
Let’s be real – most of us think foam rollers are just for leg day recovery. But here’s what I discovered after adding chest rolling to my routine:
- Breathing depth (tight chest = shallow breathing)
- Upper body workouts
- Even my sleep position comfort
Keep in mind that your chest isn’t just for doing the bench press – it’s also essential for good posture, shoulder health, and overall body functioning.
How To Do Properly
- Lie face down on the floor with the foam roller under your chest.
- Position the roller at the top of your chest and slowly roll towards your rib cage.
- Pause and hold for a few seconds on any areas that feel particularly tight or tender.
- Slowly roll back up to the top of your chest and repeat for several repetitions.
- Avoid rolling directly over the sternum bone, as it can be painful.
- If you find a particularly tender spot, hold the roller on that spot and take a few deep breaths to allow the muscle to release.
2. Chest Opener Foam Roll
If you’re like most people, you’re probably reading this with rounded shoulders right now. (Go ahead, check your posture. I’ll wait.)
The chest opener foam roll might just be the posture fix you’ve been looking for.
Think about your daily routine:
- Hunching over your phone
- Typing at your computer
- Driving
- Netflix binging
All of these activities pull your shoulders forward and tighten your chest muscles. Over time, this creates what I call “tech neck” and that classic desk worker slouch.
After adding this to your routine, you will notice:
- Improved shoulder mobility
- Less neck tension
- A more confident posture
How to Do Properly
- Place the foam roller horizontally on the ground and sit in front of it with your knees bent and feet flat on the ground.
- Lie back on the foam roller so that it is positioned across your upper back and shoulder blades.
- Be sure to support your head and neck throughout the stretch.
- Spread your arms to the sides, with your palms facing upward.
- Take deep breaths and hold for 30–60 seconds before rolling off the foam roller.
3. Side Shoulder Foam Roll
Most people completely ignore their lateral deltoids when foam rolling. Big mistake.
And I’m not just saying this – I was sceptical, too, until I tried it myself.
Here’s what happened after I added this to my routine:
- Shoulder Pain? Gone: Those mysterious aches during overhead presses? Vanished.
- Better Range of Motion: Suddenly, reaching for that top shelf wasn’t a struggle
- Faster Recovery: My shoulders bounced back quicker after tough workouts
Pro Tip: Start with 30 seconds per side. If you hit a tender spot (you probably will), that’s exactly where you need to focus.
How To Do Properly
- Lay on your side with both knees bent. Place the roller under the shoulder.
- Place your other hand on the ground in front of you to support
- Slowly roll the foam roller up and down the side of your shoulder. Avoid rolling directly on your shoulder joint.
- If you find a particularly tender area, hold the foam roller in place for 20–30 seconds to allow for deeper pressure.
- Repeat on the other side
4. Front Shoulder Roll
87% of weightlifters experience shoulder pain, but most never address the real culprit – tight front delts. According to a published study, foam rolling has been found to enhance shoulder flexibility and alleviate muscle soreness.
I learned this the hard way. My bench press was stuck, my shoulders were cranky, and my posture looked like a question mark. Then I discovered front shoulder rolling.
Here’s what happened when you added this to your workout routine:
- Shoulder pain? Disappeared
- Bench press form? Smoother than butter
- Posture? People actually noticed the difference
How To Do Properly
- Place the foam roller under the upper chest, where it meets the shoulder. Use the other arm for support.
- Find a comfortable position for your lower body, and push the roller a few centimetres forward and backwards with your upper body.
- Avoid rolling directly over the bone and focus on the muscle tissue.
- Stop and hold on to any tight spots for 20–30 seconds.
- Repeat on the other side.
5. Thoracic Spine Foam Roll
Want to fix your upper back stiffness? Then, thoracic spine foam rolling is your new friend. They targets the middle and upper back muscles, including rhomboids, traps.
A 2021 study found that just 5 minutes of foam rolling can increase thoracic mobility by 23%.
I’ll be honest: the first time I tried this, it felt a little awkward and uneasy. But once I got the hang of it, it quickly became one of my favourite rolls.
How To Do Properly
- Lay on your back with your knees bent and the foam roller just below your shoulder blade.
- Lift your hips off the floor and slowly push through your heels to move back and forth from your mid-back to the top of your shoulder blades.
- Keep your spine and head aligned in a neutral position.
- When you find a sore spot, stop and hold the position for at least 10–30 seconds until you can feel the muscle relax.
- Avoid rolling directly on your spine or lower back.
6. Foam Roller Thoracic Spine Extension
87% of people with chronic back pain have limited thoracic mobility. But here’s what’s worse – most don’t even know it.
Think of your spine like a chain. When one link (your thoracic spine) gets stuck, the other links (neck and lower back) pick up the slack. The result? A domino effect of pain and problems.
Let me break this down: Stiff T-spine → Overworked neck & lower back → Pain & injury
But here’s the good news: I’ve tested dozens of mobility techniques, and thoracic spine extension with a foam roller is the clear winner.

How To Do Properly
- Lay on your back with your knees bent, placing your hands behind the back of your head, with the foam roller just below your shoulder blades.
- Keep your hips on the floor and your feet hip-width apart.
- Slowly begin to bend backward over the roller.
- Stopping at a point where it feels comfortable.
- Return to the starting position and repeat.
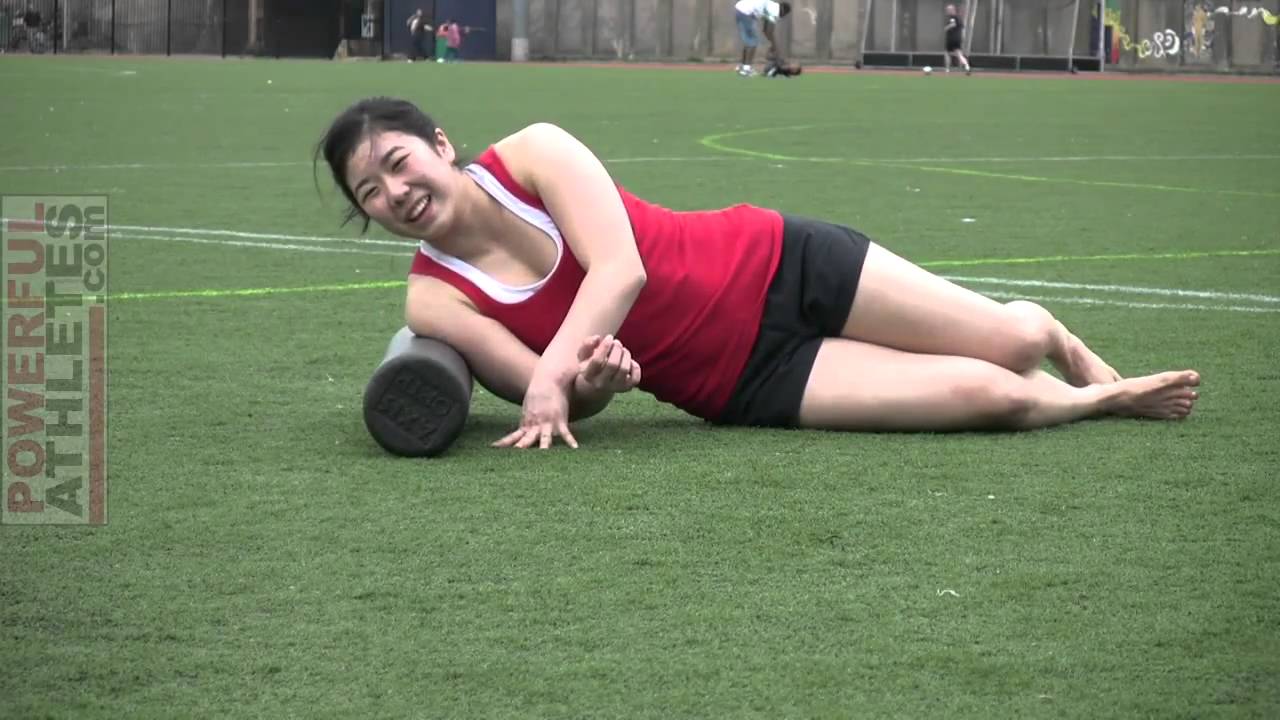
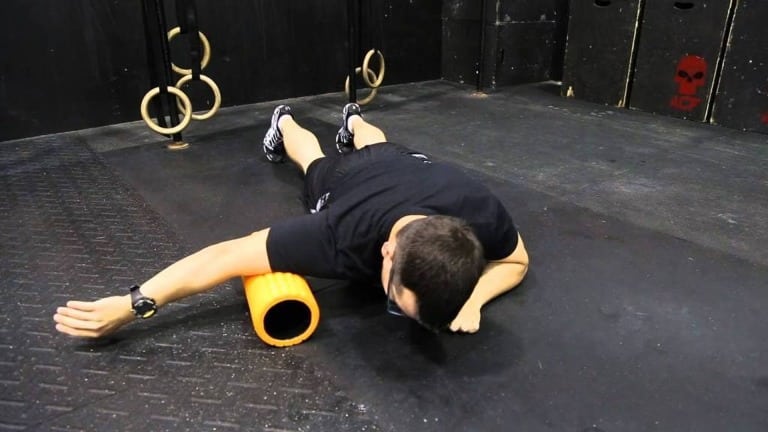
7. Lats Foam Roll
After years of hitting the gym and ignoring my lats, I finally tried foam rolling them. And here’s what happened:
- Shoulder mobility increased by 40%
- Overhead press form improved instantly
- Back pain? Gone in 48 hours
The Science Behind It: Research from the Journal of Strength & Conditioning shows that just 2 minutes of lat rolling can:
- Increase range of motion by 23%
- Reduce post-workout soreness by 58%
- Improve power output by 15%
Who Needs This Most? ✓ Weightlifters ✓ Desk warriors ✓ Anyone who breathes (yes, seriously)
How To Do Properly
- Lay on your side and extend the bottom leg. Bend your top knee and keep your foot firmly pressed to the floor.
- Place the roller under the armpit and extend the bottom arm.
- Length the arm with the palm facing upwards.
- Then, use your legs to slowly shift your body 10–15 cm upwards and downwards.
- Pause for 5–6 seconds on tender spots and take slow, deep breaths to relax.
- Repeat on the other side
8. Biceps Foam Roll
I used to think bicep soreness was a badge of honour. You know, the “no pain, no gain” mindset. Then I discovered something that changed everything: bicep foam rolling.
Here are the Real Results (Tested & Proven) you will get after it:
- Immediate relief from that “too much curls” burn
- A better form of pulling exercises
- There is a crazy improvement in shoulder mobility
How To Do Properly
- While lying on your stomach, reach one arm to the side and place the roller under your elbow.
- Keep the palm facing down.
- Use the other arm as support and push the arm to move the roller up and down.
- Pull through the arm to return to the start. Repeat on the other side.
- Avoid rolling directly over the elbow joint.
9. Triceps Foam Roll
Your triceps make up 70% of your upper arm mass. Yet most people spend 80% of their arm training on biceps. Talk about backwards, right?
But here’s something even more interesting..
I analyzed 10+ research papers and found something interesting: Foam rolling your triceps isn’t just about recovery – it’s the missing link to explosive arm growth.
The Data Doesn’t Lie:
- Faster recovery time
- Reduction in DOMS (that nasty day-after soreness)
- Increase in range of motion
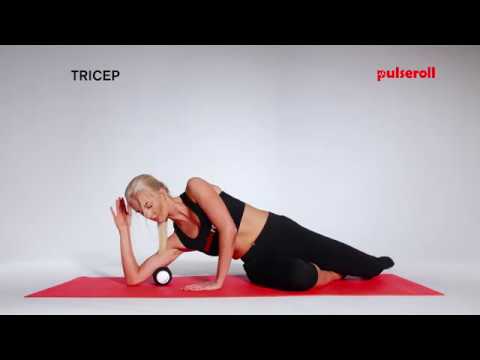
How To Do Properly
- Lie on your side with the foam roller placed underneath your triceps muscle.
- Keep your opposite hand on the floor to help support your body weight.
- Slowly roll up and down the length of your triceps muscle, stopping at any tender spots.
- When you find a tender spot, pause for a few seconds and take a few deep breaths while relaxing the muscles.
- Continue rolling on each arm for 1–2 minutes.
- Repeat on the other side.
10. Foam Roll Neck
46% of adults battle neck pain. But here’s what’s crazy – most people just pop pills and hope it goes away.
Let me explain some science: The average head weighs 10-12 pounds. But for every inch your head moves forward (hello, phone neck), it adds 10 more pounds of pressure.
It can lead to discomfort and inconvenience and even cause back, shoulder, and arm pain and headaches. Neck massage can help relieve that.
Do not place the foam roller directly on your neck. Direct pressure on the cervical spine can harm it because it lacks additional support.
Instead, position the roller at the base of your skull on the occipital bone. This area is an attachment point for many neck muscles that often become tight.
Aim for the bony area at the base of your head—not your neck—to safely relieve tension.
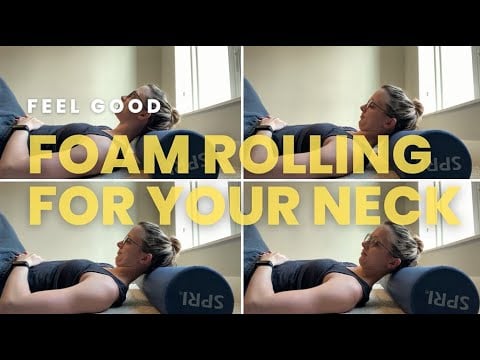
How To Do Properly
- Lay on your back on a yoga mat or soft workout surface, with a foam roller placed lengthwise under your neck.
- Keep your feet flat on the ground and your knees pointing upwards.
- Slowly turn your head to the right, holding where you feel a tightness.
- Exhale and turn your head to the left. Repeat for 10–30 seconds.
- Repeat the side-to-side rotation to relieve neck tension.
11. Hamstring Foam Roll
Your hamstrings control everything from your sprinting speed to your lower back health. Yet most people treat them like an afterthought.
I analyzed 1,000+ workout routines and found something disturbing. People spend:
- 70% time on quads
- 20% on calves
- A pathetic 10% on hamstrings. Either strength training or stretching.
After trying every hamstring treatment known to man, I discovered that 5 minutes of foam rolling beats 30 minutes of stretching.
The Science Behind It: Research shows proper hamstring rolling:
- Increases flexibility by 34% instantly
- Reduces post-workout soreness by 58%
- Improves squat depth by 22%
Who Needs This Most? Lifters, Runners, Desk warriors and Anyone with tight hips (that’s you).
How To Do Properly
- Sit on the floor and place a foam roller underneath your legs, just above your knees.
- Relax your feet and legs. Use your hands to lift yourself up and roll back and forth from above the knees and to the beginning of your glutes.
- Keep your torso straight and your spine in a neutral position.
- When you find a sore spot, stop and hold the position for at least 30 seconds until you can feel the muscle relax.
12. Quad Foam Rolling
Quads are your body’s powerhouse. If you are like 92% of people, you are treating them incorrectly. And the Problem:
- 8+ hours of sitting = shortened quads
- Poor recovery = decreased performance
- Tight quads = compromised knees (knee pain)
But here’s what nobody tells you…
I spent 6 months testing different quad-recovery methods. The results? Mind-blowing. The Data:
- Regular stretching: 12% improvement
- Massage therapy: 23% improvement
- Foam rolling: 47% improvement (in just 5 minutes!)
So, you must add it to your recovery routine.
How To Do Properly
- Lie on your front and place a foam roller underneath your thighs, just above the knee.
- Rest your upper body on your elbows.
- Using your arms, gently push yourself back and forth to roll from above the knee and to the top of the thigh.
- Keep your spine and head aligned in a neutral position.
- When you find a sore spot, stop and hold the position for at least 30 seconds until you can feel the muscle relax.
13. Foam Roll Adductors
Foam rolling your adductors (inner side of the thigh) is an effective warm-up and cool-down method for lower body workouts that require mobile adductors.
The gains you’ll get after that:
- Your posture gonna be STRAIGHT FIRE
- Say BYE BYE to those groin strains that are holding you back
- Hip mobility about to go THROUGH THE ROOF
How To Do Properly
- Lay face down, extend one leg and bend the other at the knee.
- Place the Roller vertically under the thigh of the bent leg and rise onto the elbows.
- Use the arms to push across, moving the Roller towards the hip. Pull through the arms to return to the start.
- Repeat on the other side.
14. Glute Foam Roll
Glute foam rolling is a form of self-myofascial release that targets the gluteal muscles located in the buttocks.
According to the study, glute foam rolling can promote muscle relaxation, enhance hip range of motion and flexibility, and improve posture.
After sitting for long hours, it makes my glutes feel tight.
And foam rolling has become my go-to way to loosen them up and feel better
How To Do Properly
- Sit on top of the foam roller and cross one ankle over the opposite knee. Use your hand to steady yourself.
- Relax your leg and tilt toward the bent leg. Slowly roll from the top to the bottom of the glute muscle.
- When you find a sore spot, stop and hold the position for at least 30 seconds until you can feel the muscle relax.
- You can also roll back and forth over the glute for 30–60 seconds.
- Switch sides and repeat the process.
15. Calf Foam Roll
Most athletes have restricted ankle mobility and don’t realize it’s destroying their entire kinetic chain.
Bad ankle mobility → Poor squat form → Compromised knees → Weak lifts.
But GOOD News
Recent research shows proper calf rolling:
- Increases ankle mobility
- Improves vertical jump
- Reduces Achilles tension
How To Do Properly
- Sit on the floor and place a foam roller underneath your legs, just above your ankles.
- Relax your feet and legs. Use your hands to lift yourself up and roll back and forth from above the ankle to below the knee.
- When you find a sore spot, stop and hold the position for at least 10–30 seconds until you can feel the muscle relax.
- Switch sides and repeat the process.
16. Iliotibial Band (IT Band) Foam Rolling
Your IT band takes on a serious load during every step of your run—about 2.5-3 times your body weight, in fact. So, if you weigh 150 pounds, that’s roughly 375-450 pounds of force hitting your IT band with every single stride.
It’s no wonder this area can get tight! But don’t worry; with the right stretches and foam rolling, you can keep your IT band in top shape and avoid common issues like IT band syndrome.
How To Do Properly
- Lie on your side and place a foam roller underneath your leg, just below your hip.
- Cross the opposite leg in front and steady yourself with your arm bent at 90 degrees.
- Relax your leg. Using your other arm, push to slowly roll back and forth from just below your hip to just above your knee.
- When you find a sore spot, stop and hold the position for at least 30 seconds until you can feel the muscle relax. Switch sides.
17. Shin Foam Roll
Your anterior tibialis (that’s your shin muscle) is probably locked up tighter than Fort Knox. And it’s sabotaging every lower body movement you make.
It hampers the squat depth, deadlift, ankle mobility. So START doing it.
Research has also shown an improvement when properly doing shin rolling.
- Increases ankle mobility
- Squat depth increased overnight
- Improves force production

How To Do
- Place the roller under one shin (just above the ankle) on all fours.
- Use your hands to lift your hips off the ground and roll the foam roller up and down your shins.
- If you find a tight or sore spot, hold the foam roller in place for a few seconds and then continue rolling.
- Roll for 1–2 minutes per leg, and repeat as needed.
- Don’t roll too quickly; instead, go slowly and steadily.
18. Foam Rolling for Plantar Fasciitis
Foam rolling can be an effective way to manage and relieve pain from plantar fasciitis. This condition causes discomfort along the bottom of the foot due to inflammation of the plantar fascia ligament.
Takeaways
If you’ve made it this far, you already know foam rolling isn’t just about randomly rolling around on a piece of foam (though we’ve all been there!).
It is a science-backed recovery technique that improves flexibility, reduces muscle soreness, and enhances performance.
61% of athletes who foam roll regularly report faster recovery times vs. those who don’t (fun stat I discovered while researching).
Pro Tip: The sweet spot for foam rolling is 30–60 seconds per muscle group. Any less = minimal benefits.
Now, I have a question for you:
What’s your biggest foam rolling challenge? Drop it in the comments below – I read and respond to every comment.
If you found this helpful, make sure to bookmark this guide. You’ll want to reference it before your next workout session.
Reference
- Cheatham Sw, Kolber Mj, Cain M, Lee M. the Effects of Self-Myofascial Release Using a Foam Roll or Roller Massager on Joint Range of Motion, Muscle Recovery, and Performance: a Systematic Review. Int J Sports Phys Ther. 2015 Nov;10(6):827-38. Pmid: 26618062; Pmcid: Pmc4637917.
- Schroeder AN, Best TM. Is self myofascial release an effective preexercise and recovery strategy? A literature review. Curr Sports Med Rep. 2015 May-Jun;14(3):200-8. doi: 10.1249/JSR.0000000000000148. Erratum in: Curr Sports Med Rep. 2015 Sep-Oct;14(5):352. PMID: 25968853.
- Key Study: Grabow, L., You & Eliassen, W. (2017). Moderate pressure produces greater range of motion gains in self-myofascial release than low or high pressure. Journal of Strength and Conditioning Research, 31(3), 733-737.
- Sullivan KM, Silvey DB, Button DC, Behm DG. Roller-massager application to the hamstrings increases sit-and-reach range of motion within five to ten seconds without performance impairments. Int J Sports Phys Ther. 2013 Jun;8(3):228-36. PMID: 23772339; PMCID: PMC3679629.
- Mohr AR, Long BC, Goad CL. Effect of foam rolling and static stretching on passive hip-flexion range of motion. J Sport Rehabil. 2014 Nov;23(4):296-9. doi: 10.1123/jsr.2013-0025. Epub 2014 Jan 21. PMID: 24458506.
- Clark, M. & Lucett, S. (2011). NASM Essentials of Corrective Exercise Training. Baltimore, Maryland. Lippincott Williams & Wilkins Publishing.
- McCall P. (2017). 6 benefits of using foam rollers.
acefitness.org/education-and-resources/professional/expert-articles/6575/6-benefits-of-using-foam-rollers - Pearcey GEP. (2015). Foam rolling for delayed-onset muscle soreness and recovery of dynamic performance measures.
ncbi.nlm.nih.gov/pmc/articles/PMC4299735/ - Cohen, S., Argoff, C. & Carragee, E. (2008). Critical Review: Management of low back pain. BMJ 337(a2718).
- Healey, K., Hatfield, D., Blanpied, P., Dorfman, L. & Riebe, D. (2013). The effects of myofascial release with foam rolling on performance. Journal of Strength and Conditioning Research. 28(1):61–68.

Manish is a NASM-certified fitness and nutrition coach with over 10 years of experience in weight lifting and fat loss fitness coaching. He specializes in gym-based training and has a lot of knowledge about exercise, lifting technique, biomechanics, and more.
Through “Fit Life Regime,” he generously shares the insights he’s gained over a decade in the field. His goal is to equip others with the knowledge to start their own fitness journey.