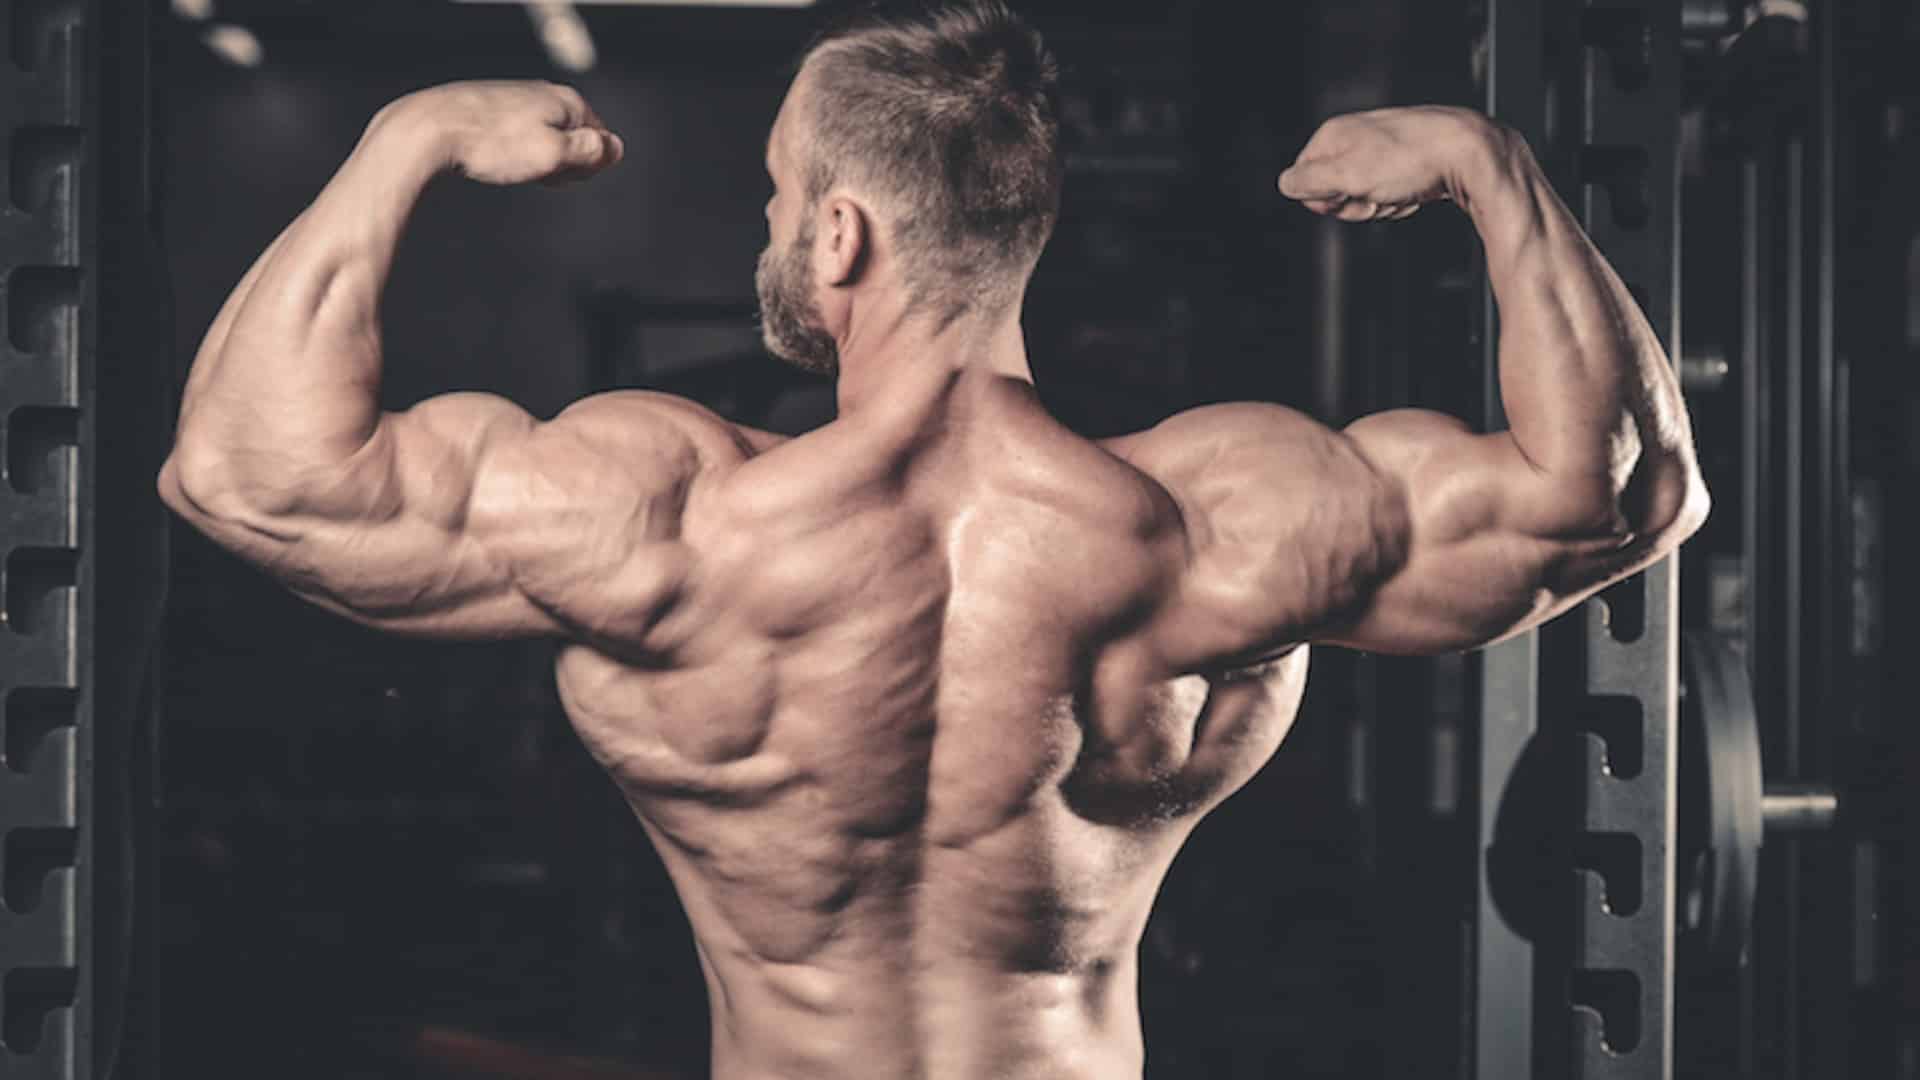
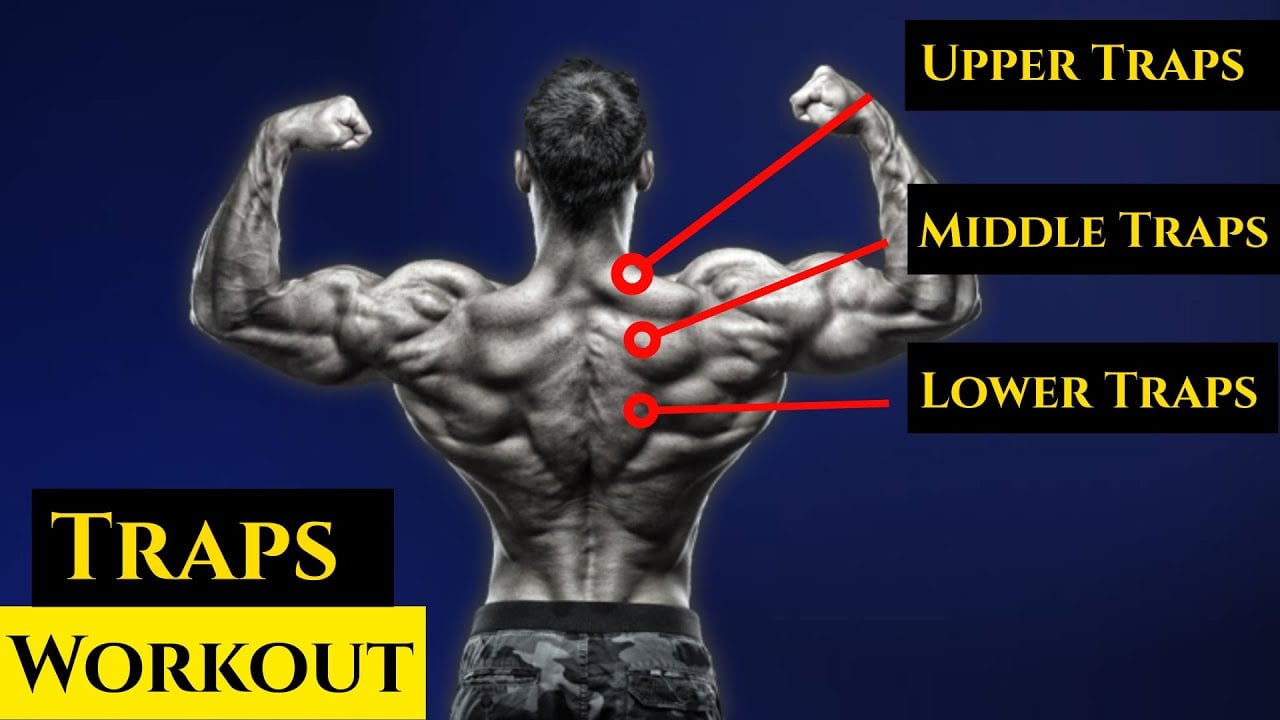
Most people obsess over building massive upper traps while ignoring their lower traps completely.
Big mistake.
Strong lower trapezius muscles are essential for shoulder stability, proper posture, and prevention of rounded shoulders and nagging neck and shoulder pain.
In this guide, I’ll show you:
- Most effective, science-backed lower traps exercises
- Exactly how to perform each movement with perfect form.
- Workout Routine
The best part? You don’t need fancy equipment or hours in the gym. Most of these exercises can be done with minimal gear and added to your routine.
Let’s dive in and fix those neglected lower traps once and for all.
- How To Train The Lower Trap
- Scapular Depression
- Scapular Upward Rotation
- Scapular Adduction (Retraction): Assists
- 10 Best Lower Trap Exercises
- 1. Incline Y-Raise
- 2. Cable Y Raises
- 3. Scapula Dip
- 4. Face Pull
- 5. Cable High Row
- 6. Bent Over Dumbbell Lateral Raise
- 7. Resistance Band Pull Apart
- 8. I, Y, T, W
- 9. Scapular Wall Slide
- Tips
- 10. Seated Cable Row
- FAQs
- Can I do lower trap exercises without equipment?
- How often should I train my lower traps?
- Do rows work lower traps?
- References
How To Train The Lower Trap
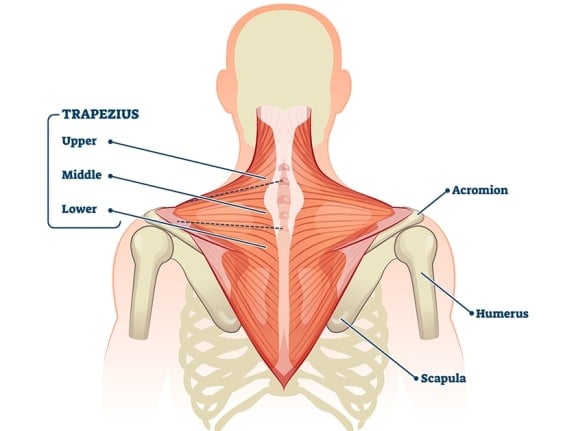
The lower trapezius originates from the spinous processes of the thoracic vertebrae, specifically from T6 to T12. It inserts onto the spine of the scapula, particularly at the medial border.
Think of them starting mid-to-lower back (along your spine) and running diagonally up and out to attach to the inner ridge of your shoulder blades.
Based on its origin, insertion, and fiber direction, when the lower trapezius contracts (shortens), it pulls the insertion (scapular spine) towards the origin (thoracic spine).
As a result, the scapula does the following main movements:
Scapular Depression
The fibers pull the scapular spine downwards, the most direct action. Imagine actively pulling your shoulder blades down your back, away from your ears.
Exercises:
- Prone Y-Raise (or Incline Y-Raise)
- Scapular Dips (on dip bars or a bench)
- Reverse Shrugs
Scapular Upward Rotation
This is a synergistic action. The lower traps work with the upper traps (which pull up on the outer part of the scapula/clavicle) and the serratus anterior (which pulls the bottom of the scapula forward and around the ribcage) to rotate the scapula upwards.
The lower trap depresses the medial base of the scapular spine, allowing the glenoid fossa (shoulder socket) to tilt upwards.
“Reach long through your fingertips (overhead),” “Keep shoulder blades anchored as you lift.”
Exercises:
- Wall Slides / Scapular Slides
- Overhead Shrugs
- Face Pulls (especially with an upward pull angle)
Scapular Adduction (Retraction): Assists
Although the middle trapezius is the primary force behind pure retraction, which involves squeezing the shoulder blades together, the oblique line of pull of the lower traps helps direct the scapulae toward the midline (spine), particularly when combined with depression.
“Squeeze a pencil between your shoulder blades, then try to slide it down.”
Exercises Combined Depression and Retraction:
- Prone Cobra / Prone W-Raise
- Band Pull-Aparts (with a slight downward angle)
- Incline Dumbbell Rows (with a focus on scapular movement)
To effectively train the lower traps, you need exercises that move the scapular spine downwards and inwards towards the thoracic spine, and/or facilitate controlled upward rotation by anchoring the medial scapula.
10 Best Lower Trap Exercises
Here are the best exercises to add to your routine for better lower trap development.
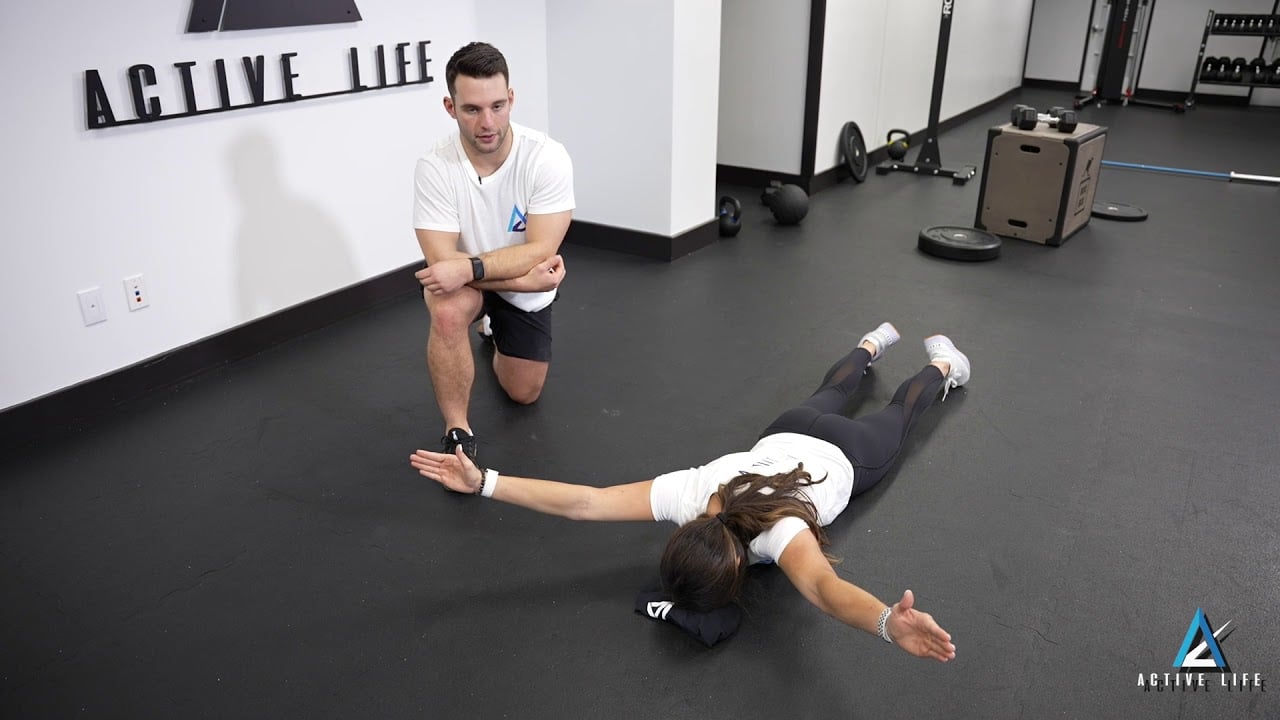
1. Incline Y-Raise
Y Raises are a great and easy-to-do shoulder stability exercise that targets both the rotator cuff muscles and your lower traps.
Although the Y Raise is commonly performed on an incline bench, you can modify it to suit your needs and perform in various ways: standing on the floor, on a flat or incline bench, or even on a Swiss ball.
A study has shown that strengthening the lower trap is a great way to reduce neck pain and increase the range of motion in patients with chronic cervical pain.
How To Do
- Set an adjustable bench to a low incline. Start around 30 degrees, but you can experiment with angles from 15 to 45 degrees to find where you best feel the target muscles.
- Grab a pair of very light dumbbells. Lie face down on the bench, chest resting on the pad.
- Let your arms hang straight down towards the floor, positioned just outside the width of the bench.
- With arms kept mostly straight (a very slight bend is okay), simultaneously raise both dumbbells out to the sides and slightly forward, forming a “Y” shape relative to your body.
- Raise the dumbbells until your arms are roughly parallel to the floor, or slightly higher.
- Slowly and under control, lower the dumbbells back to the starting position. Allow your shoulder blades to move naturally apart as the weight descends.
Tips
- Start with lightweight. Do not attempt an ego lift; it’s about activating specific muscles. The weight is likely too heavy if you can’t do 15+ controlled reps.
- Don’t shrug upwards with your upper trap. Think about pulling your shoulder blades down your back and bringing them together. Feel the contraction between and below your shoulder blades and in the back of your shoulders.
2. Cable Y Raises
The Cable Y Raise is a highly effective isolation exercise for strengthening the rear delts, lower traps, and rotator cuff stabilisers.
Y-raises involve the lower trapezius for scapular upward rotation and depression, aided by the serratus anterior for rotation and protraction. The posterior deltoids and sometimes supraspinatus perform shoulder abduction/flexion. The middle trapezius may assist with retraction, and the rotator cuff stabilizes the joint.
You can do this exercise with one arm at a time, but training both arms equally will help you avoid muscle imbalances and keep everything in harmony.
You can do the Y-raise with or without weights or water bottles, as well as with a resistance band.
How To Do
- Set up a cable machine with the pulleys set as low as possible. Attach a single D-handle to each cable.
- Grab a D-handle in each hand using an overhand grip (palms facing down).
- Stand facing the cable machine. Take one or two steps back to create tension, ensuring the weight stack is slightly off the pins.
- Your arms should be extended downwards and slightly in front of you. Maintain a slight forward lean from your hips.
- Keep your arms relatively straight (a slight bend in the elbow is fine). Raise both arms simultaneously, making a letter ‘Y’ shape.
- Raise your arms until they are roughly in line with your torso (or slightly above, if comfortable and controlled)
- Avoid shrugging your upper traps excessively towards your ears; the focus is on upward rotation and depression of the scapula’s lower tip.
- Slowly lower your arm back to the starting position. Do 10-12 repetitions for 3 sets.
Tips
- Raise your arms in a wide “Y” shape—roughly at a 45° angle from your torso
- Avoid shrugging your shoulders up to your ears. Keep them relaxed and down.
3. Scapula Dip
The main job of your lower traps is to pull your shoulder blades DOWN (scapular depression)? Well, scap dips are exactly that movement.
Because your arms stay straight, your triceps and chest are mainly absent. This forces your lower traps (and other scapular depressors to do the heavy lifting.
In a scap dip, you let them ride all the way up, then you forcefully pull them all the way down. That “pulling down” action is your lower traps working hard.
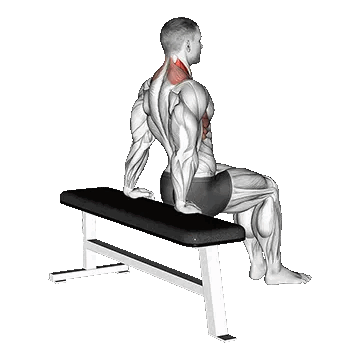
How To Do
- Ensure you have a strong, steady grip on the chair or elevated surface. This will help you maintain proper alignment throughout the movement and keep your arms straight.
- Place your hands on the side of a flat bench so that your body is perpendicular to the bench when you place your feet out in front of you. Your knees should be bent at a 90-degree angle.
- Keep your body upright and straight. Move your body towards the floor and let your ears touch your shoulders.
- Push your torso back to the starting position by driving your shoulder blades down.
- Perform 10–15 repetitions for 2–3 sets.
Tips
- The key to scapula dips is slow, controlled movements. Rushing through the motion can lead to poor form and reduced effectiveness. Take time with each rep to fully engage your muscles and ensure the scapula moves correctly.
- It’s easy to inadvertently shrug your shoulders during the upward movement, but try to avoid this. The goal is to passively lift the shoulders towards the ears, not tense them up. This will help shut off the overactive upper traps and allow the lower traps to take over.
- If you’re new to scapula dips, start with 5–8 controlled reps and gradually increase as your shoulder mobility and strength improve.
4. Face Pull
If I had to select a single exercise that I consider essential for nearly every client, it would undoubtedly be the Face Pull. This exercise effectively targets the rear deltoid and the trapezius muscles, particularly the lower and middle trap.
- As you pull the rope back towards your face, your upper arms move horizontally away from the front of your body. This action primarily trains the rear deltoids.
- Simultaneously, you should pull your shoulder blades together towards your spine. During this motion, the middle Trapezius and Rhomboids power train.
This is one of my favourite exercises. It helps me build a bigger trap and rear delt.
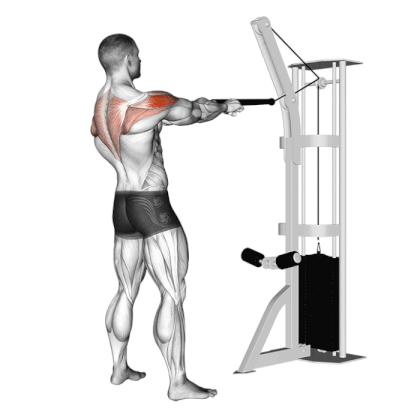
How To Do
- Set up a cable machine with a rope attachment at roughly eye level or slightly higher (this is a good starting point; you can experiment with height later).
- Grab the rope with an overhand grip (palms facing down/towards the floor), placing your thumbs against the ends of the rope.
- Step back from the machine until the weight stack is slightly off the pins, creating tension. Your arms should be extended forward.
- Assume a stable stance (feet shoulder-width, maybe one slightly forward). Keep your chest up, your shoulders relaxed down (not shrugged up initially), and your core engaged.
- Pull the rope directly towards your face, aiming for a point between your nose and forehead.
- As you pull, actively retract your shoulder blades. Continue pulling until the ends of the rope are pulled past your ears, and your hands are near the sides of your head.
- Then, slowly return the rope to the start position and repeat for reps.
Tips
- Stand straight with your feet in a comfortable, balanced stance.
- Think about trying to pinch your shoulder blades as tightly as possible when pulling weight toward your face.
- Your upper arms should be straight out to your sides, with elbows bent
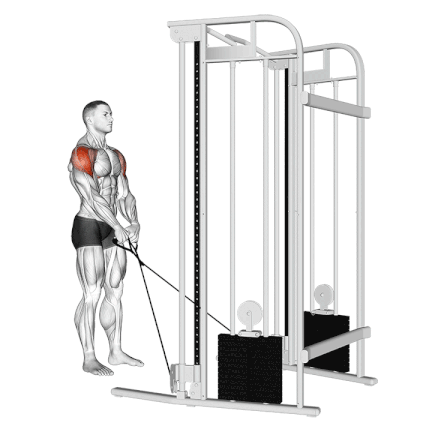
5. Cable High Row
Half kneeling high cable row rope is a tremendous exercise that effectively works many muscles, including the shoulder, back, wing, and middle and lower trapezius muscles.
This exercise gives people with shoulder issues an exercise to benefit from rows.
In addition, face pull is one of the most effective corrective exercises for compensating for poor posture and shoulder dysfunction.
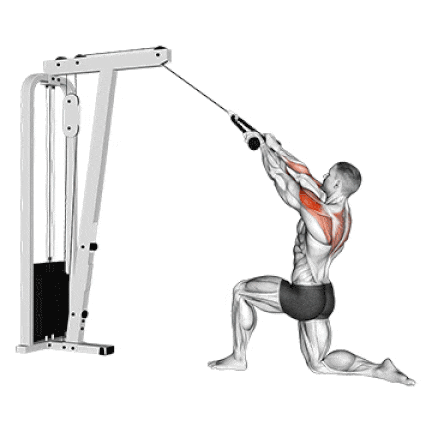
How To Do
- Set up a cable machine with the pulley set high, with the rope attachments
- You can perform this seated, kneeling, or standing – kneeling often provides excellent stability and allows for a good stretch. Let’s describe kneeling.
- Grab it with a neutral grip (palms facing each other).
- Reach up and grab the attachment. Lean back slightly from your hips.
- Initiate the pull by driving your elbows downwards and back. Focus on squeezing your shoulder blades together and pulling them down your back.
- Slowly return to the starting position. Repeat 10–15 reps.
Tips
- Don’t lean backwards to pull the weight towards you.
- Retract your shoulder blades as you pull, squeezing the upper back.
- Experiment slightly with the pulley height to see where you feel the contraction most effectively in your mid/lower back.
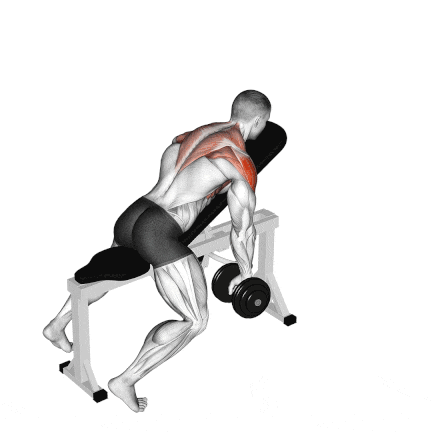
6. Bent Over Dumbbell Lateral Raise
Bent-over raises are an excellent exercise for isolating and working specifically on the rear deltoid, middle, and lower trap muscles. They are a must for complete shoulder muscle development.
Thus, the exercise hit precisely the rear delt and mid-trap head by isolating it.
This exercise can be performed in both a standing and a seated position. I prefer the seated version, as it requires strict movement.
There are many variations of bent-over lateral raises that you can add to your workout routine, each with its unique benefits.
- Dumbbell Bent Over Raise: Enhances shoulder stability with free weights.
- Cable Rear Delt Lateral Raise: Constant tension for efficient muscle activation.
- Incline Bench Rear Raise: Increases stretch and contraction for rear delt development.
- One-Arm Rear Bent Over Raise: Improves symmetry and targets rear deltoid isolation.

How To Do
- Stand with your feet shoulder-width apart. Hold a dumbbell in each hand with a neutral grip (palms facing each other). Hinge forward at your hips, keeping your back straight and chest up, and keep your back straight and chest up. Y
- Our torso should be roughly parallel to the floor or slightly higher. Let the dumbbells hang straight down in front of us, below our shoulders.
- Keep your elbows bent and lift the dumbbells out to the sides in a wide arc.
- Raise the dumbbells until your upper arms are roughly parallel to the floor.
- Slowly and with control, lower the dumbbells back to the starting position.
Tips
- One of the biggest mistakes people make is swinging their arms or leading with their hands. Instead, keep a soft bend in the elbows and imagine lifting with your elbows to engage the rear delts and mid-traps.
- If you struggle with maintaining form or back position in the standing version, the bench-supported variation is gold standard for strict execution.
7. Resistance Band Pull Apart
It’s a great shoulder and upper back exercise that primarily targets the posterior deltoids, lower trapezius, and rhomboid.
When you perform a band pull apart, you’re creating horizontal abduction at the shoulder joint while simultaneously engaging scapular retraction and depression – the perfect storm for lower trap activation.
Regular practice of resistance band pull-apart can counteract the negative effects of prolonged sitting and poor posture.
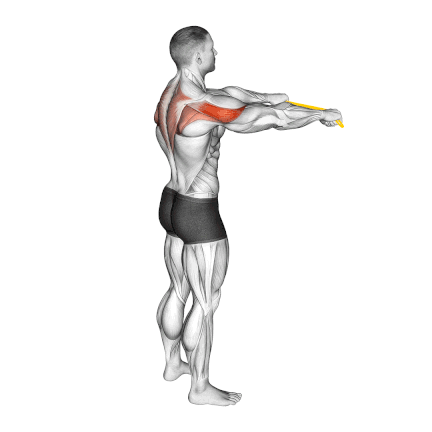
How To Do
- You should stand with your feet shoulder-width apart and keep a slight knee bend.
- Hold the exercise band in front of you with your hands slightly lower than your shoulders.
- Keep your elbows slightly soft to avoid hyperextending the joint.
- Keep your elbows up so you can target your upper back muscles correctly.
- Squeeze the shoulder blades together and open the arms out to either side, pulling the band apart and squeezing your rhomboids.
- Return to the start and repeat, keeping the tension on the band the entire time.
- If you’re training at home, I recommend having at least 3 band strengths to ensure proper progression. The sweet spot for most beginners is a band that allows full range of motion while creating noticeable fatigue by rep 12-15.
8. I, Y, T, W
These exercises focus on the shoulder and back muscles, mainly the middle and lower part of the trapezius.
They also hit all the rotator cuff muscles, including the rhomboid, infraspinatus, subscapularis, teres minor, and supraspinatus muscles.
These work together to stabilize the shoulder and move the arm. They are my favourite exercises for working on the rhomboid muscle.
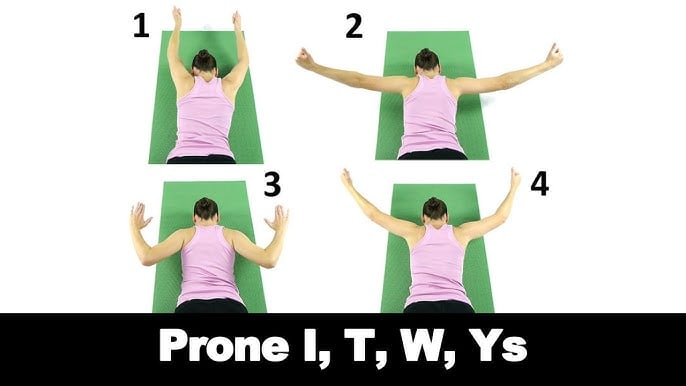
How to Do
- Lay your stomach flat on the ground with your arms and legs fully extended.
- Point your toes away from your body and stretch your elbows and fingers fully.
- Brace your abdominal muscles to stabilise your spine.
- Depress and retract your scapulae (pull your shoulders back and down).
- And attempt to hold these positions (I, Y, T, W) for 5 – 10 seconds.
- Align your head with your thoracic (upper) spine.
Tips
- Add a 1-3 pound weight in each hand to increase the difficulty for either version.
- For the first time, try holding for only five or 10 seconds, and work up to 30 seconds in future workouts.
- Move your arms slowly up and down in each position of I, T, Y, and W.
9. Scapular Wall Slide
Scapular wall slides, also known as wall slides or reverse wall slides, are one of the basic and best exercises for improving shoulder rotation, upper back activation, and rotator cuff muscle strength and mobility.
Wall slides target the muscles responsible for scapular stability, such as the serratus anterior, lower trapezius, and rhomboid.
A study found that wall slide exercises improve scapular position and reduce tension on the upper trap muscle. They work the muscles surrounding the scapula and shoulder for dynamic and static stability.
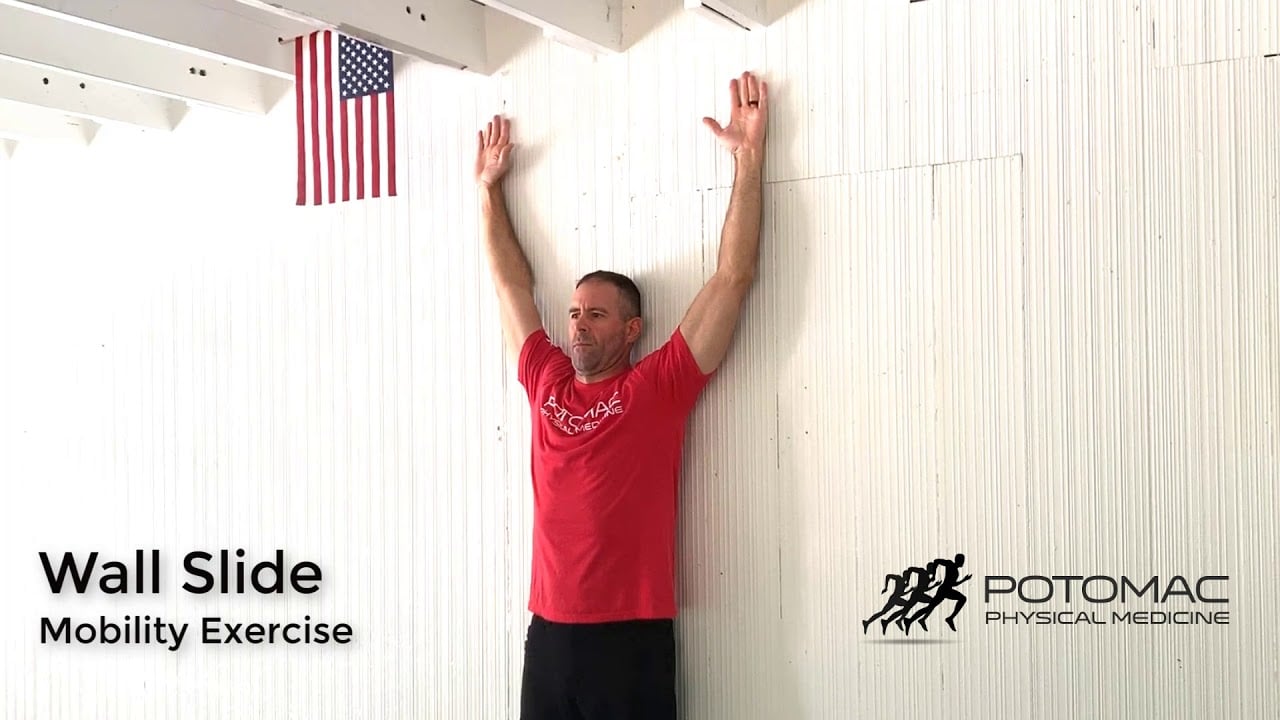
How To Do
- Stand with your back straight against the wall.
- Keep your feet at least 6 inches, and keep the back of your head, shoulders, and butt against the wall.
- Make sure your knees aren’t fully locked.
- Slowly raise your arms up the wall until they are elevated above your shoulders and at 90-degree angles from your torso.
- Keep your chest open and your back tall, and gently squeeze the muscles in your midback as you slide your arms down toward your shoulders.
- Slowly slide your arms down the wall and keep them as close to the wall as you can.
- Hold this position for one count. Inhale and then push your arms back up to the starting position.
Tips
- Avoid lifting or shrugging your shoulders towards your ears during the exercise. Keep your shoulders relaxed and down, concentrating on engaging the muscles around the shoulder blades.
- Maintain a neutral spine alignment throughout the exercise to avoid unnecessary strain on the lower back.
- Avoid tilting your head back excessively or jutting your chin forward. Keep your neck aligned with your spine and maintain a neutral position to prevent strain on the neck muscles.
10. Seated Cable Row
Seated Cable Rows are a fantastic compound exercise for building overall back thickness and strength (targeting lats, rhomboids, and mid traps primarily).
Your lower traps will be involved, but it’s generally NOT the most direct or effective exercise if your sole goal is to isolate and maximally strengthen your lower traps through their primary functions.
This exercise can be performed in various ways to target back muscles from different angles.
- A pronated (overhand) grip tends to target the upper and middle trapezius,
- Meanwhile, a neutral (thumbs up) grip hits the middle and lower trapezius.
- A supinated (underhand) grip switches the focus to the latissimus dorsi.
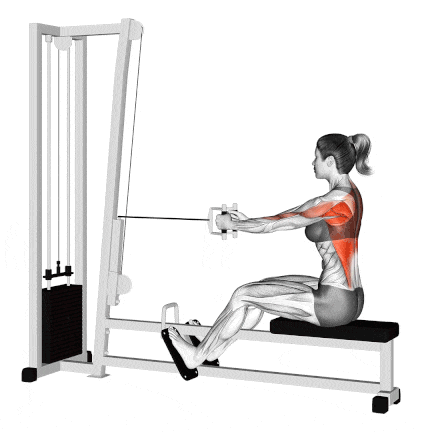
How To Do
- Sit on a seated cable pulley rowing machine with legs slightly bent and feet supported against the crossbar.
- Take hold of the handles with your arms extended and back stretched.
- Pull the handles to come as close to the lower chest as possible.
- Thrust your chest out while pulling with your body in an upright position.
- Slowly return the handle to the starting position.
Tips
- Pause briefly when the handles are close to the chest and squeeze your upper back muscles, bringing the scapulae closer.
- Keep your knees slightly bent to avoid knee and lower back pressure.
- Remember, a rounded back is a wrong back. Keep it straight at all times.
Know More: Guide To Mastering The Cable Row: Benefits, Form, Variation
FAQs
Can I do lower trap exercises without equipment?
Yes, you can effectively target your lower traps without equipment through bodyweight exercises like:
- Standing Y Raise
- Scapular Squeezes
- Wall slides
- Prone Y raises on the floor
- Prone angels (moving arms from sides to overhead while lying face down)
- Plank with scapular retraction
- Floor swimmers
How often should I train my lower traps?
Include specific lower trap exercises into your routine 1–2 times weekly. Allow adequate rest and recovery between sessions to promote muscle growth and prevent overtraining.
Do rows work lower traps?
Yes, rows work the lower traps. Rows, including exercises like bent-over rows, inverted rows, and cable rows, effectively target the upper back’s lower traps and other muscles.
References
- Lindman R, Eriksson A, Thornell LE. Fiber type composition of the human male trapezius muscle: Enzyme‐histochemical characteristics. American Journal of anatomy. 1990 Nov;189(3):236-44.Available: https://pubmed.ncbi.nlm.nih.gov/2148051/
- Bergin, Michael; Elliott, James; Jull, Gwendolen (2011). “The Case of the Missing Lower Trapezius Muscle”. Journal of Orthopaedic & Sports Physical Therapy.
- Effects of Lower Trapezius Strengthening Exercises on Pain, Dysfunction, Postural Alignment, Muscle Thickness and Contraction Rate in Patients with Neck Pain; Randomized Controlled Trial: https://pubmed.ncbi.nlm.nih.gov/32202262/
- The Effect of Middle and Lower Trapezius Strengthening Exercises on Rotator Cuff Tendinopathy:
- Effects of Lower Trapezius Strengthening Exercises on Shoulder Range of Motion: https://pubmed.ncbi.nlm.nih.gov/17394154/
- International Journal of Sports Physical Therapy: “A Systematic Review of the Exercises That Produce Optimal Muscle Ratios of the Scapular Stabilizers in Normal Shoulders”
- American Council on Exercise: “ACE-Sponsored Research: What Is the Best Back Exercise?”

Manish is a NASM-certified fitness and nutrition coach with over 10 years of experience in weight lifting and fat loss fitness coaching. He specializes in gym-based training and has a lot of knowledge about exercise, lifting technique, biomechanics, and more.
Through “Fit Life Regime,” he generously shares the insights he’s gained over a decade in the field. His goal is to equip others with the knowledge to start their own fitness journey.