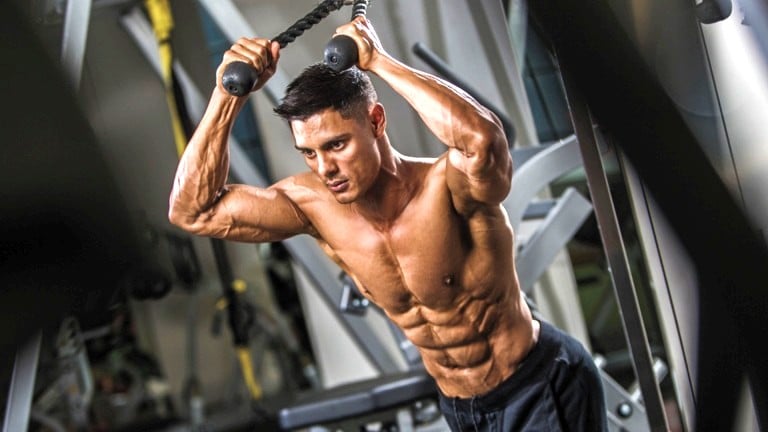
You are in the right place if you are looking for the best abs exercises for men to build six-pack abs and strong core muscles. If you do the right exercises for your abs, you can get a toned and smooth six-pack.
Why do men focus on ab workouts? Besides the aesthetic appeal, strong abdominal muscles support your spine, improve posture, enhance athletic performance, and prevent back pain.
We will take you through the most effective ab exercises that will target all areas of your core, from sit-ups to planks and from leg raises to cable twists.
Furthermore, we will provide you with expert guidance on form, frequency, and intensity to maximize your results.
Next time you do an ab workout, please pick three of the moves below and stick to them. We promise you’ll feel the burn and see results.
Want To Build Six Pack ABS: Use Our Free Calculator To Know Your Fat Loss Calories Requirement

- 20 Best Abs Exercises For Men To Get Six-Pack Abs
- 1. Sit-Ups
- 2. Crunch
- 3. Cable Crunch
- 4. Lying Straight Leg Raise
- 5. Plank
- 6. Side Plank
- 7. Twisting Sit-Up
- 8. Incline Leg Raise
- 9. Seated Knee Up
- 10. Reverse Crunch
- 11. Bicycle Crunch
- 12. Cross-Body Mountain Climber
- 13. Oblique Crunches
- 14. Dumbbell Side Bend
- 15. Standing Cable Oblique Crunches
- 16. Abs wheel rollout
- 17. Barbell rollout
- 18. Hanging Knee Raise
- 19. Hanging Windshield Wiper
- 20. Machine Crunch
- The Anatomy Of Your Abs
- Rectus Abdominis
- External And Internal Obliques
- Transverse Abdominis
- Core
- Design Your Abs Workout Plan
- Sample Ab Workout Routines for Men
- Sample Ab Workout Routine For Beginner
- Advanced Men Ab Workout Routines
- FAQs
- How often should I do ab workouts?
- How many sets and reps should I do for ab exercises?
- Can I get a six-pack by doing ab workouts alone?
- Can I do ab workouts every day?
- How can I make my ab workouts more challenging?
- Conclusion
- Complete Abs Workout Routine For Men
20 Best Abs Exercises For Men To Get Six-Pack Abs
Here, we’ll give you 20 best ab exercises for men, step-by-step instructions, and tips to make the best ab workout routine and get the strong core and six-pack abs you’ve always wanted.
An effective men’s abs workout should include exercises that target all areas of your midsection.
- For your upper abs, select a crunch or setup.
- Choose leg raises, knee-ups, or reverse crunches for your lower abs.
- To complete your workout, target the sidewall with a twisting, oblique crunch, side bend, and many more.
1. Sit-Ups
It is one of the best ab workouts that works your core muscles, including your upper and lower abs, obliques, and hip flexors. They help promote good posture by strengthening your lower back and gluteal muscles.
One of the reasons the Sit-Up has gotten negative attention is because of the poor form used by so many people.
When done slowly and carefully, sit-ups will not cause back pain. Instead, it can aid digestion, build muscle, and improve posture over time.
How To Do
- Hook your feet under the pad and sit upright on the decline bench with your torso.
- Place your hands behind your head.
- Contract through your abs to lift your shoulders and upper back off the decline bench.
- Hold this position for a second and then slowly return to the starting position.
- Do the negative part of the exercise as slowly and carefully as the positive part.
- Repeat the desired number of reps.
Tips
- Avoid overusing your hip flexors.
- Don’t lean forward with your head. Keep a natural head position.
- Don’t let your shoulders roll forward. Keep your chest up and shoulders back.
2. Crunch
A crunch is an abdominal exercise that primarily targets the upper abs. Unlike traditional sit-ups, crunches emphasize flexing the spine while keeping the lower back on the ground.
The crunch motion occurs in the upper spine, and your shoulders rise a few inches off the floor.
Your lower back remains in contact with the floor, and the hips have no motion. This differs from a sit-up, which moves at the waist and hips.
How To Do
- Lie on the floor with your knees bent to your feet and your lower back flat.
- Place your hands behind your head and contract through your abs to lift your shoulders and upper back off the floor.
- Hold this position for a second and then slowly return to the starting position.
- Repeat the 15-20 of reps.
Tips
- Keep the movement slow and controlled. Don’t use momentum.
- Don’t pull on your neck with your hands; this will strain it.
- Breathe out as you crunch, and maintain your core muscles tight and engaged.
3. Cable Crunch
The cable crunches are a weighted crunch variation that targets your abs muscles. There is a huge advantage to doing crunches on a cable apparatus.
The cable increases resistance, enabling you to train to failure using heavier weights and fewer reps. This increased emphasis on strength and hypertrophy is exactly what the fast-twitch muscle fibers in your abs need to get big and carved.
Depending on personal preference, you may perform this exercise while facing toward or away from the weight stack.

How To Do
- Kneel in front of a high pulley. Grasp the rope attachment in each hand and place your wrists against the sides of your head.
- Lower your torso by flexing your hips, but allow the rope’s weight to lift your upper torso to extend your lower back.
- Keeping your hips fixed, exhale as you pull the rope downward by flexing your abdomen so that your back becomes arched.
- Hold for a count of two. Relax your abdomen and allow the rope to lift your upper torso so that your lower back goes back to being extended.
Tips
- Keep your neck in a neutral position.
- Keep your hips fixed. All of the movement should be in your abdomen.
- Don’t choose a heavy weight that your lower back handles most of the resistance.
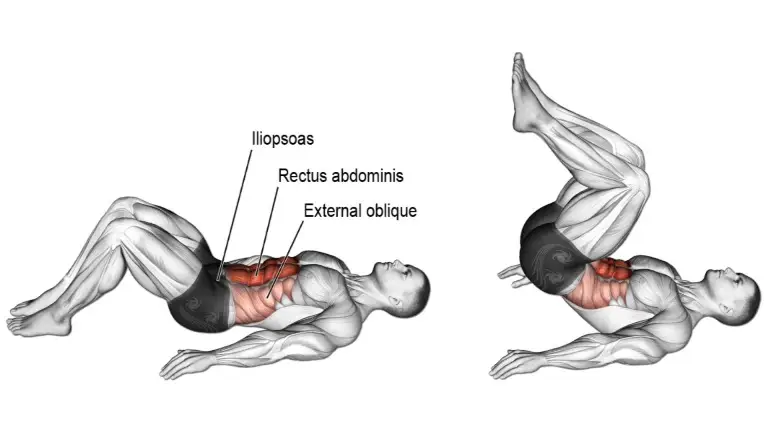
4. Lying Straight Leg Raise
Lying leg raises are touted as killer abs exercises, but your hip flexors actually reap some major benefits. So don’t be surprised if your hips feel a bit of a burn during this one.
It mainly works on the lower part of your abs, making it stronger and more toned. It also strengthens the quadriceps without stressing the knee joint.
You don’t need anything special to do a straight leg raise. All you need is a place where you can lie on your back.
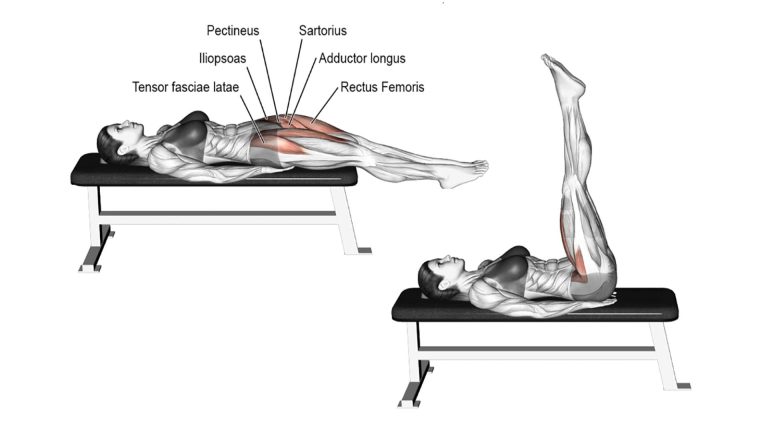
How To Do
- Lie flat on your back on a mat or the floor with your legs extended and your arms by your sides.
- Keep your legs straight and together.
- Engage your core muscles and lift both legs upward towards the ceiling.
- Hold your legs a few inches off the floor.
- Continue lifting until your legs are perpendicular to the ground or until you feel tension in your abs.
- Slowly lower your legs back down to the starting position.
- Repeat for the desired number of repetitions.
Tips
- Keep your lower back pressed against the bench or mat.
- Control the upward and downward motion of your legs.
5. Plank
The plank is a highly effective and versatile exercise that targets the entire core, including the abs, obliques, lower back, and stabilizing muscles.
A plank is an isometric exercise where you hold a static position, resembling the top of a push-up. It engages the core muscles by challenging their endurance and stability.
It is more of a strength-building exercise than a cardio exercise. It engages many muscles and can also help lose weight.
Variations of Plank for Beginners:
- Knee Plank
- High Plank on Knees
- Side Plank on Knees
Advanced Variations of Plank
- Side Plank with Leg Lift
- Plank Jacks
- Spiderman Plank
- One-Legged Plank
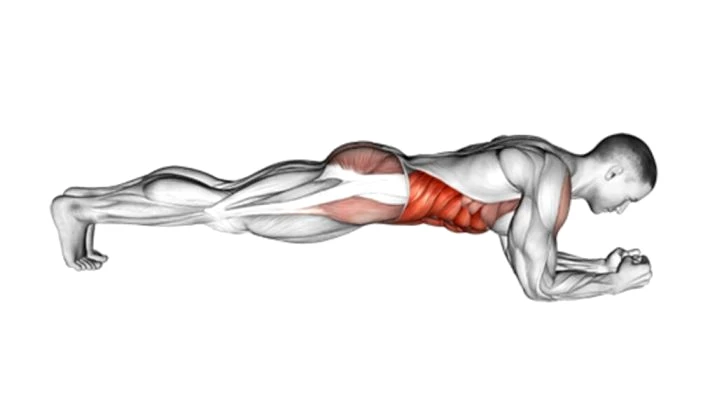
How To Do
- Start to get in a push-up position, but bend your elbows and rest your weight on your forearms instead of on your hands.
- Your body should form a straight line from your shoulders to your ankles.
- Brace your core by contracting your abs like you were about to be punched in the gut.
- Hold the position for a specific duration, such as 30 seconds to 1 minute.
Tips
- Do not let your lower back sag or your butt rise. Ensure your body is straight and rigid.
- Keep your glutes and core muscles contracted.
- Your neck should be aligned with your body, not tilted up, which could strain the neck.
6. Side Plank
The side plank (oblique plank) is one of the best abs exercises for men for strengthening the oblique abdominal muscles, which help to reduce love handles.
The side plank position strengthens the side abs muscles, which don’t get worked as much during abs exercises like crunches. It also activates the shoulder, arm, and back muscles.
If you’re new to planking, you should master the basic forearm plank before moving on to the side plank variation.
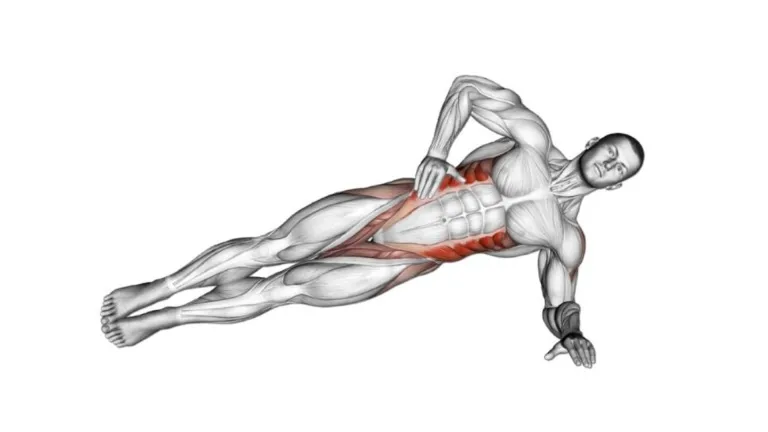
How To Do
- Lie on your side with your legs extended and feet stacked on top of each other.
- Place your elbow directly beneath your shoulder and align your forearm parallel to your body.
- Engage your core, raise your hips off the ground, and draw a straight line from your head to your feet.
- Keep your neck relaxed and gaze straight ahead or slightly upward.
- Hold the position for a desired amount of time (start with 20-30 seconds), and then lower your hips back down.
- Repeat on the other side.
Tips
- Keep your legs and body straight.
- Avoid letting your hips sag during the exercise
- Squeeze your abs and glutes throughout the movement for stability.
7. Twisting Sit-Up
The twisting sit-up is an abs and oblique exercise made to strengthen your core and build muscle. This abs exercise is highly recommended for men with intermediate to advanced lifting abilities.
- To make it easier, cross your arms over your chest or perform the exercise on a flat bench.
- To make it harder, hold a weight plate behind your head, in your hands, or chest.
- Also, tilting the bench at a more decline angle makes the exercise harder.
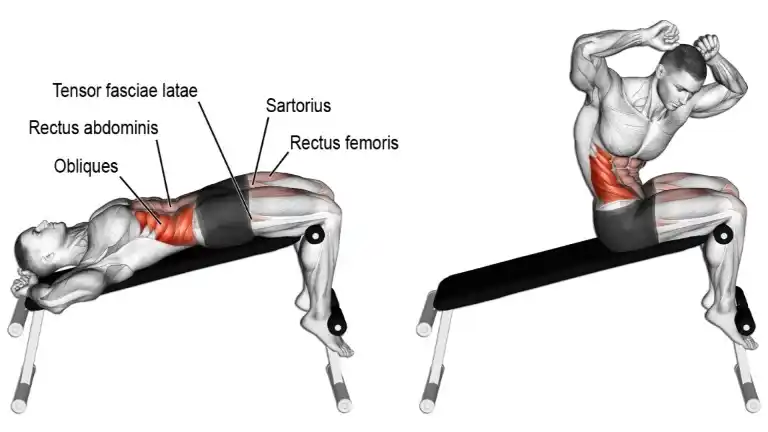
How To Do
- Sit on the decline bench, hook your feet under the pad, lean back, and position your hands behind your head.
- As you sit up, twist your torso, directing your right elbow toward your left knee.
- Reverse the motion and lower your torso to the starting position.
- During the next repetition, point your left elbow at your right knee.
- Keep repeating and alternating the side to which you twist your waist.
Tips
- Keep your neck in a neutral position.
- Use a slow, controlled motion to target the muscles.
8. Incline Leg Raise
Leg raises are among the most popular abs exercises for men. These moves are very similar to sit-ups, but in this case, the abdominal muscles lift the lower body and pull it forward to the upper body, not the opposite.
Incline Leg raise works the rectus abdominis (six-pack muscles) and the oblique (side abs). But, due to the nature of the exercise, the hip and leg muscles are also engaged, particularly at the beginning of the movement.
If you have an adjustable sit-up bench, you can make the move harder or easier by changing the board’s angle.
How To Do
- Lie supine (on your back) on an inclined bench with your legs together.
- Place your hands beside your head and grip the bench for support.
- Support your back by pressing your lower back against the bench.
- Exhale as you slowly raise your legs and curl your hips off the bench.
- Try to hold the contracted position with your legs in the air.
- Inhale as you slowly lower your hips and legs to the starting position.
Tips
- Keep the movement slow and controlled. Do not use momentum.
- Do not let your heels rest on the floor.
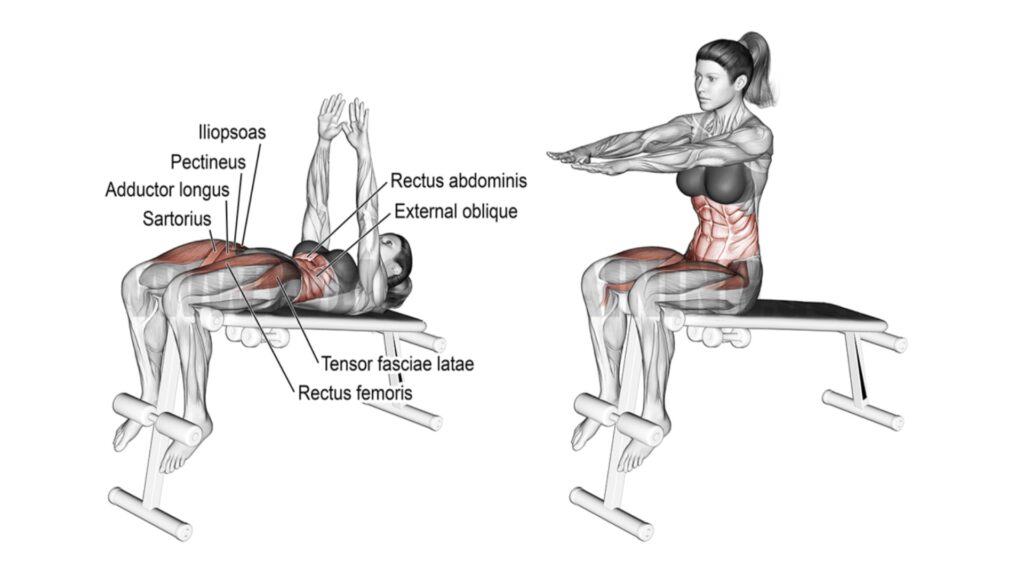
9. Seated Knee Up
The seated knee up is also known as the seated knee tuck and is an essential part of any men’s ab workout routine. Knee-ups are very important for athletes who run, jump, and kick their legs forward and up.
Keep the trunk stable for best results, and bring the knees as close to the chest as possible.
This will result in greater shortening and stronger muscular contractions of the abs muscles.
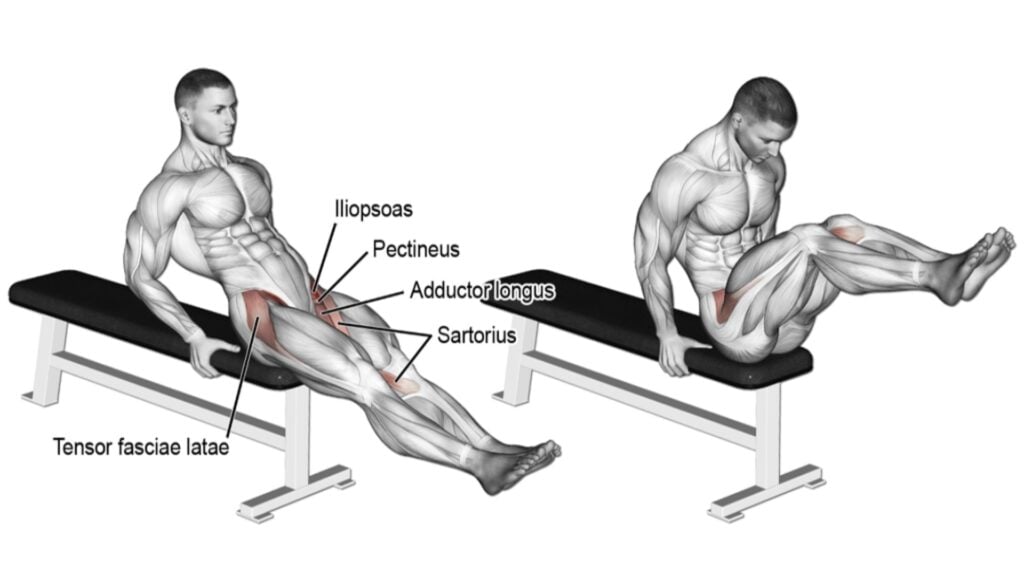
How To Do
- Sit on the edge of a flat bench, legs hanging down with knees slightly bent, and grip the bench behind you.
- Lean backward and raise your legs a little off the floor. Keep them straight and together.
- Raise your knees up toward your chest, keeping your legs together.
- Lower your legs back down until your heels almost touch the floor.
Tips
- Keep your back straight and your feet off the floor.
- Holding a dumbbell between your feet makes the seated leg raise more difficult.
- Lean back slightly so that your torso makes a 45- to 60-degree angle with the bench.
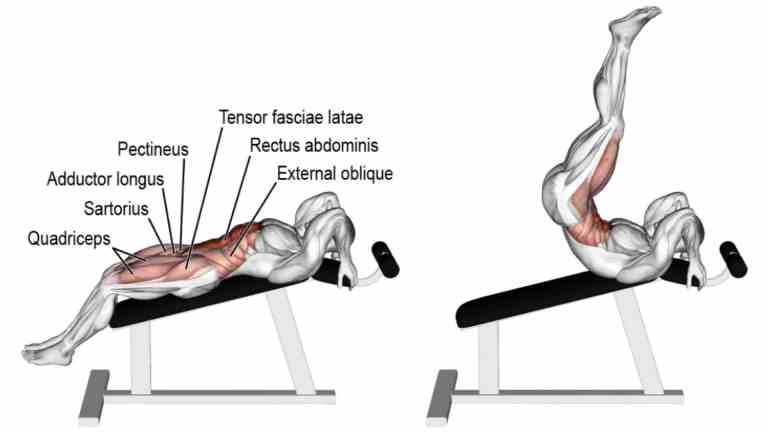
10. Reverse Crunch
The reverse crunch is a challenging core exercise for men that primarily hits your lower ab, the muscle in your abdomen that makes up your “six-pack.
It is an intermediate-level variation of the popular abs crunch exercises.
A reverse crunch offers many of the same benefits as the traditional crunch. However, since your neck and most of your back are on the ground, it is thought to be easier on your spine.
How To Do
- Lie face up on the floor with your hands extended at your sides.
- The feet are up, and the thighs are perpendicular to the floor (your hips and knees should form a 90-degree angle).
- Slowly bring your knees toward your chest, lifting your hips and glutes off the floor.
- Try to maintain the bend in your knees throughout the movement.
- Slowly lower your legs back to the starting position under control motion.
- Repeat for the desired number of repetitions.
Tips
- Keep the movement slow and controlled. Do not use momentum.
- To make this exercise more difficult, perform it on a decline bench with your head on the high end.
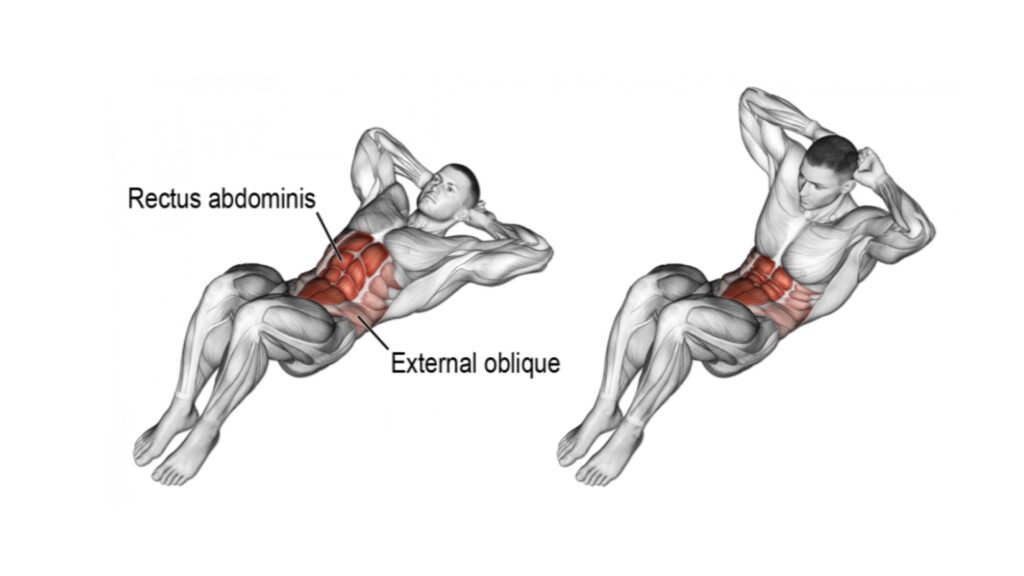
11. Bicycle Crunch
The bicycle crunch targets the rectus abdominis (six-pack muscles), obliques, and hip flexors, providing a comprehensive workout to get to love handles.
A 2001 study by ACE found that compared to the standard crunch, the bicycle crunch produces 148% more mean activity in the abs and 190% more mean activity in the obliques.
How To Do
- Lie on the floor with your legs straight and lower back flat on the floor.
- Place your hands behind your head and raise your feet and upper back slightly off the floor.
- Simultaneously, bring your right knee towards your chest while rotating your torso to bring your left elbow towards your right knee. Aim to touch them together.
- Return to the starting position and repeat the movement.
- This time, bring your left knee towards your chest while rotating your torso to bring your right elbow towards your left knee.
- Continue alternating sides in a bicycle pedaling motion.
Tips
- Keep your neck neutral and your lower back pressed against the floor.
- Ensure you don’t pull your neck with your hands, or else you can get a neck strain.
12. Cross-Body Mountain Climber
The cross-body mountain climber is a dynamic exercise that targets the entire core, including the abs, obliques, and hip flexors.
With this, you can improve your balance, agility, coordination, strength, flexibility, and blood circulation because it engages multiple muscle groups simultaneously.
To increase the intensity, perform the exercise faster or bring your knees in toward your elbows with a slight hop.
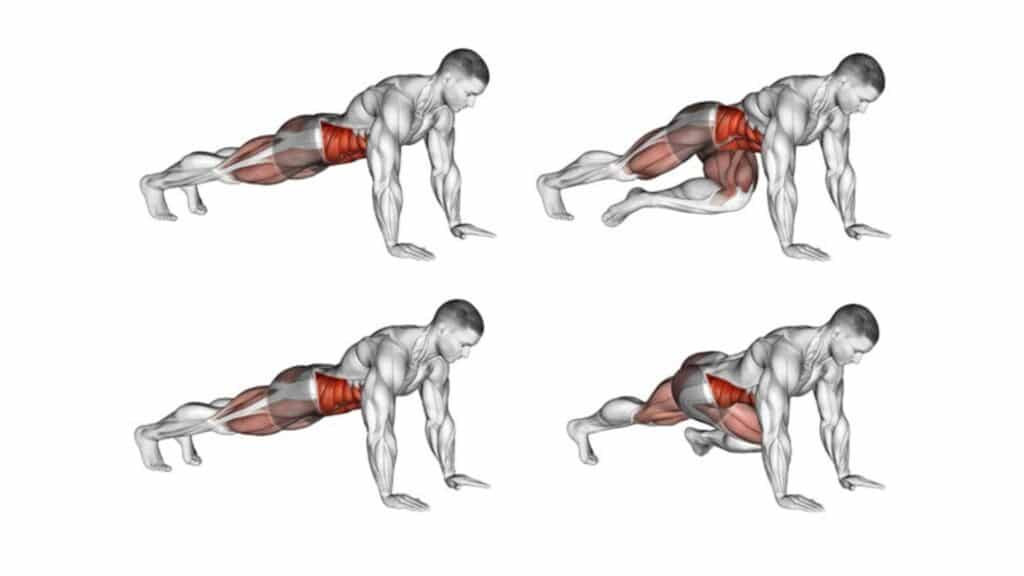
How To Do
- Start in a high plank position with your hands directly beneath your shoulders.
- Your body should form a straight line from your shoulders to your ankles.
- Squeeze your abs, lift one foot off the floor, and bring your left knee towards your right elbow.
- Return to the starting position and immediately bring your right knee toward your left elbow, again crossing your body diagonally.
- Continue alternating the movement, bringing each knee toward the opposite elbow in a controlled and rhythmic manner.
Tips
- Don’t round your lower back.
- Don’t lift your hips too high. Your body should form a straight line from your shoulders to your ankles.
- Maintain a steady and controlled pace, focusing on proper form rather than speed.
13. Oblique Crunches
The oblique crunch is a bodyweight exercise that targets your core muscles—specifically the obliques on the side abs.
Many ab exercises for men focus only on the abs, but it’s also wise to focus on strengthening the rest of the core muscles so your strength is balanced.
Strong oblique muscles also help improve posture and balance and enhance athletic performance by allowing the trunk to rotate more easily.
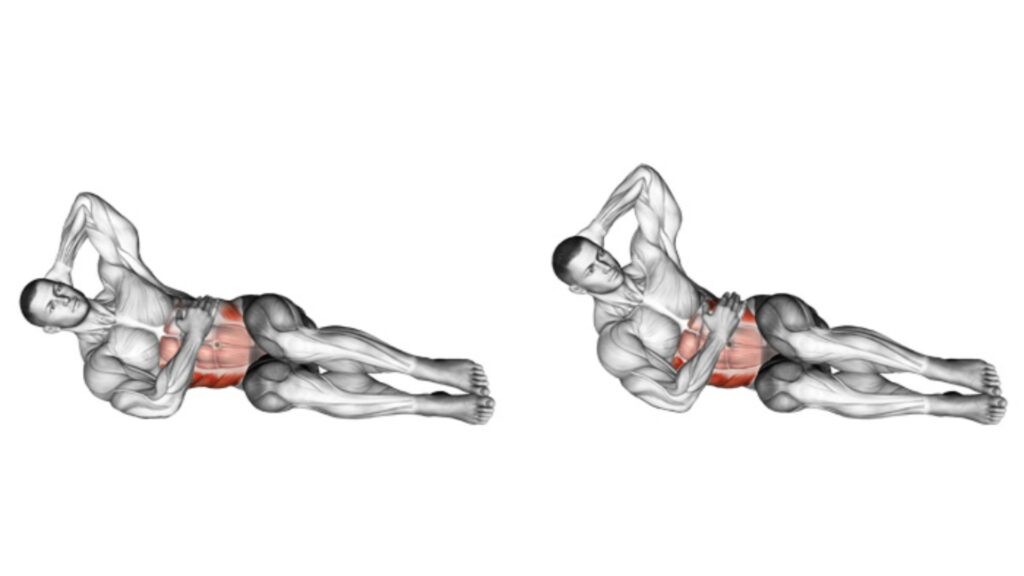
How To Do
- Lie on the floor on your right side with your hips and knees bent.
- Place your left hand behind your head and place your right hand across your body and on the obliques.
- Placing your hand on your obliques can help you feel the muscles contract and enhance the mind-muscle connection.
- Contract your obliques to lift your shoulder off the floor.
- Hold this position briefly, contracting your obliques as hard as possible.
- Then, return to the start position.
- Complete all reps on the left side and then repeat on the right side.
Tips
- Hold a weight plate on your chest to make this exercise more difficult.
- Perform this exercise slowly and steadily to work the obliques.
- Your torso crunches 30 to 45 degrees upward from the floor.
14. Dumbbell Side Bend
Dumbbell side bends are isolation exercises that target muscle groups on the side of your body—specifically the oblique muscles.
The exercise is highly efficient in targeting the internal and external obliques, enhancing the lateral flexion of your spine, enhancing spinal mobility, and aiding in developing a robust and stable core.
- If you’re new to the exercise, practice the movement with your body weight alone.
- For a more challenging variation, use a kettlebell or a pulley machine for the cable side bend variation.
It is usually performed for relatively high reps, at least 8-12 reps per set or more. It can be performed one side at a time or alternating sides.
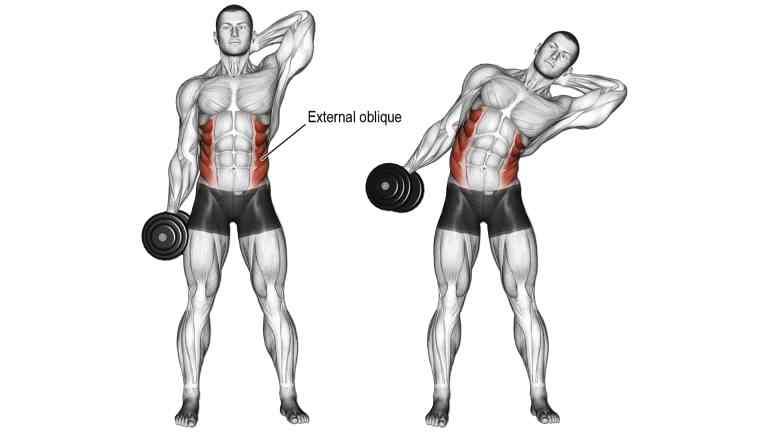
How To Do
- Stand with your feet shoulder-width apart.
- Hold a dumbbell with a neutral grip in your right hand and your arm at your side.
- Bend sideways at the waist to the left as low as possible, using your oblique muscles to pull your torso down.
- Hold for a second and return to the starting position.
- Complete the desired number of reps and repeat on the other side.
Tip
- Keep the dumbbell close to your side, your elbow very slightly bent, and your hips still.
- Perform this exercise slowly and steadily to work the obliques.
- Avoid using a heavy dumbbell for this exercise.
- Always keep your back straight, eyes facing forward, and bend at the torso only.
Know More: Best Dumbbell Abs Workout To Build Six Pack Abs
15. Standing Cable Oblique Crunches
Standing oblique crunches are good ab exercises for men to work their oblique muscles. You do them by standing up.
It’s utilized to build the oblique muscles of the core, which gives the midsection a more aesthetic appearance and helps to create the V-taper look. This exercise also improves stability in the lower back and hips.
When doing an abs workout with a cable machine, you should add unilateral exercises to correct potential imbalances.
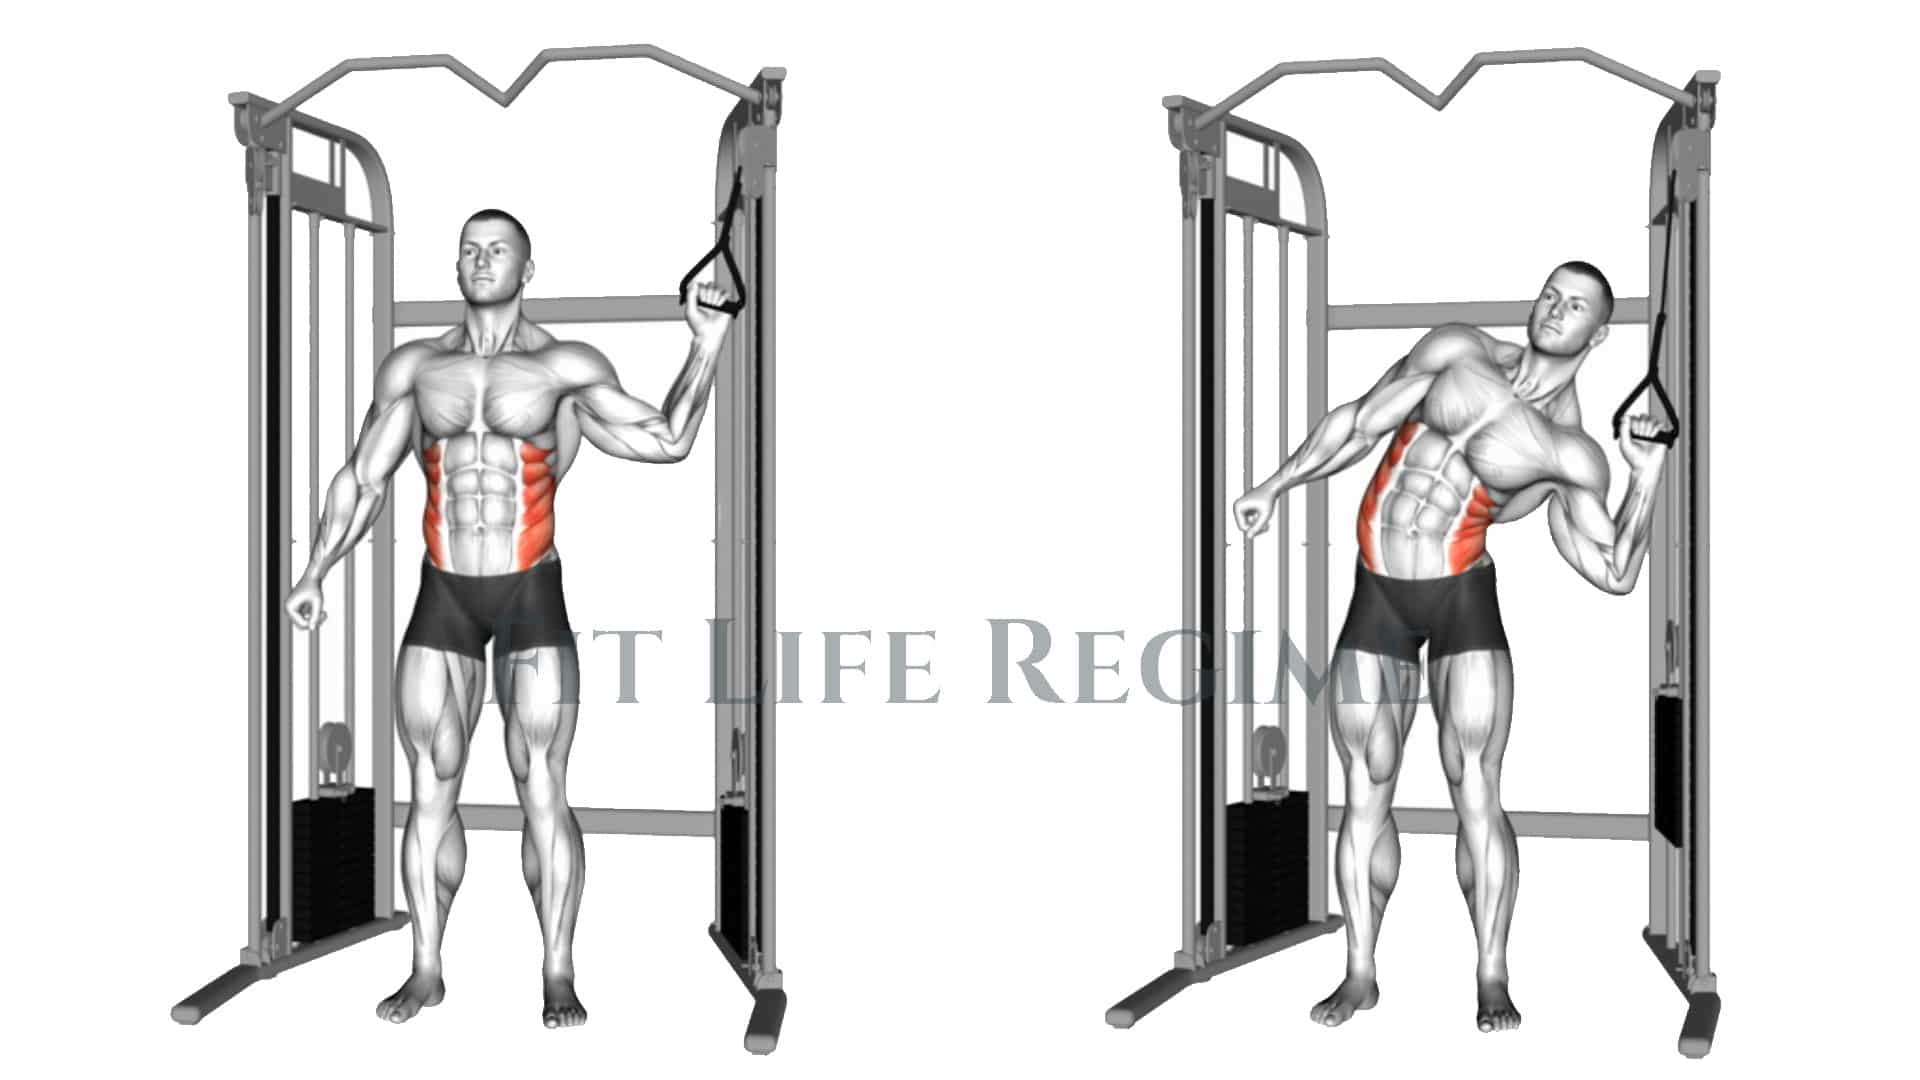
How To Do
- Attached D-handle to a high pulley and stood side-on to the weight stack.
- Grasp the D-handle with your left hand and stand with the pulley to your left side.
- Ensure your forearm is positioned at an angle of 90 degrees to the upper arm and your feet are firmly placed on the floor at shoulder width.
- Keeping your head up and back straight, pull the weight down using your left oblique muscle as far as possible.
- Pause for a second and then return to the initial position.
- Repeat for the desired number of repetitions. Turn around and repeat the cable side bend with your left side.
Tips
- Keeping your head up and back straight, pull the weight down using your left oblique muscle as far as possible.
- Don’t bend too far down during the crunch, as this could cause injury.
16. Abs wheel rollout
The Ab wheel rollout exercise is considered to be a great move to assist the development of aesthetic abs. They’re also an excellent conditioning exercise for athletes. This ab wheel workout can be used at home or in gyms.
The wheel rollout exercise is one of the little advanced abs exercises. Here are a few tips to start.
- You can start with the plank and move on to the wheel rollout when you’re ready.
- You can also make the exercise easier by performing it up an inclined surface.
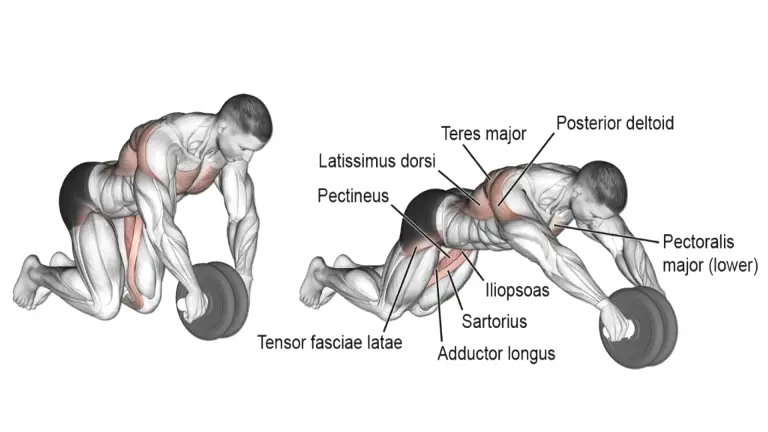
How To Do
- Kneel on the floor and grasp the ab wheel roller with your hands
- Your arms should be straight and your torso fairly upright in the start position.
- Allow the abs wheel to roll forward as far as possible with your knees and toes touching the floor while you maintain your grip.
- The goal is to be as flat as possible in the finish position, with your torso and upper legs parallel to the floor and hovering just a couple of inches above it.
- Then, reverse the motion to pull the abs wheel back toward your knees until your body is upright again.
- Repeat for as many reps as possible.
Tips
- Squeeze your abs and glutes throughout the movement for stability.
- Move within a comfortable range of motion. You should not strain your lower back.
- Do not allow your hips to sag at any point during the movement.
17. Barbell rollout
The barbell roll-out is one of the best abs exercises that utilize a barbell instead of an ab roller.
It is best performed with a barbell with rotating collars and is considered more difficult than other ab roller variations.
Many lifters may not be able to perform a single rep at first, but once they can perform these for reps, they’ll be rewarded with a seriously strong core.
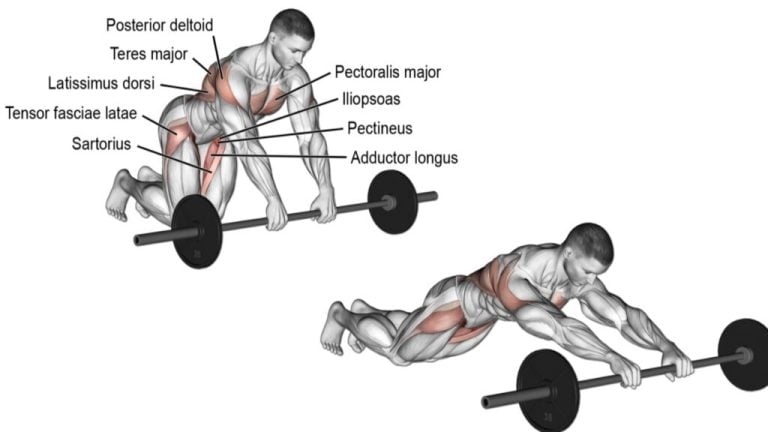
How To Do
- Kneel on the floor in front of a loaded barbell and grab the barbell with an overhand, shoulder-width group.
- Your arms should be straight and your torso fairly upright in the start position.
- Allow the bar to roll forward as far as possible with just your knees and toes touching the floor while you maintain your grip on the bar.
- The goal is to be as flat as possible in the finish position, with your torso and upper legs parallel to the floor and hovering just a couple of inches above it.
- Then, reverse the motion to pull the bar back toward your knees until your body is upright again.
- Repeat for as many reps as possible.
Tips
- Squeeze your abs and glutes throughout the movement for stability.
- Move within a comfortable range of motion. You should not strain your lower back.
- Do not allow your hips to sag at any point during the movement.
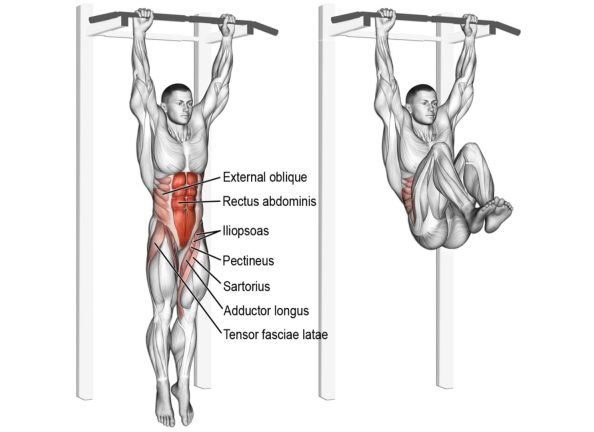
18. Hanging Knee Raise
Hanging knee raise is one of the great ab exercises for men to isolate the abs muscles, build core strength, and develop the six-pack. This exercise primarily targets the lower abdominal muscles, while also focusing on the obliques and hip flexors.
Its Increasing basic strength and hypertrophy of those muscle groups can assist in movements like squats, cleans, snatches, bracing, and more.
Raise your knees as high as possible to maximize muscular effort. Keep your knees slightly bent as you lower your legs down to maintain tension on the abs.
How To Do
- Grab a bar with an overhead grip, with the hands slightly wider than shoulder-width and your knees slightly bent.
- Keep your core and glutes tight to keep your back and hips in the correct position.
- Lift your legs, bending your knees on the way up to pull your knees up toward your chest while rounding your lower back to bring your glutes forward and up.
- Pause in this position for a second.
- Slowly lower your legs back down to the start position, inhaling as you go down.
- Continue for the desired reps.
Tips
- Try not to use momentum to raise your legs. keep the movement slow and under control.
- To make it more difficult, straighten your legs (hanging straight leg raise), or hold a dumbbell between your feet.
- Remember to engage your core before you raise your knees
- Keep your back straight to avoid putting too much pressure on your spine.
Know More: The Ultimate Guide To Abs Gym Workouts: From Beginner To Advanced
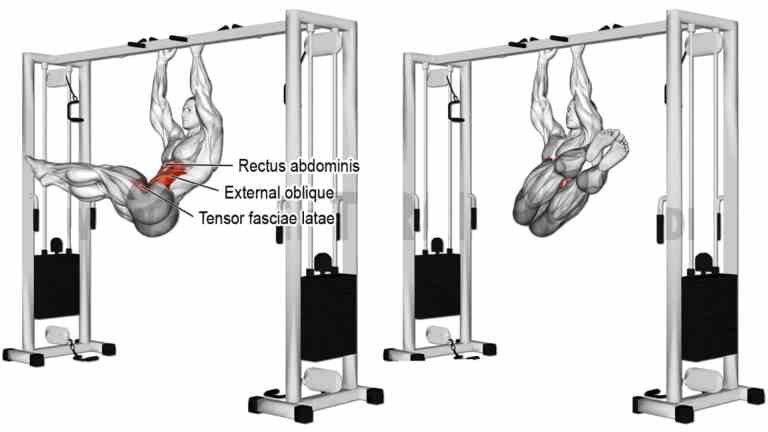
19. Hanging Windshield Wiper
The hanging windshield wiper is an advanced exercise for strengthening your core and the twisting movement pattern of your body. Before attempting it, ensure you have good grip strength, flexibility, and balance.
The name ‘hanging windshield wiper’ comes from the posture you adopt, which resembles the window wipers of a car. You perform each rep with a hang-up.
The goal is to rotate the torso from one side to the other whilst maintaining a horizontal position.
How To Do
- Grab a bar with an overhead grip, with the hands slightly wider than shoulder-width.
- Keep your core and glutes tight to keep your back and hips in the correct position.
- Lift your legs towards the bar. Keep your arms and legs straight. Your legs are perpendicular to your torso.
- Now, rotate your legs to one side until they are parallel with the floor, roughly 90 degrees.
- Slowly and with control, rotate your legs to the other side. Keep your legs as straight as possible.
- Continue for the desired reps.
Tips
- Do not lower your legs beyond feeling a mild stretch in your side.
- You can make a move easier by bending your knees.
- Don’t use momentum to aid you; use your core strength.
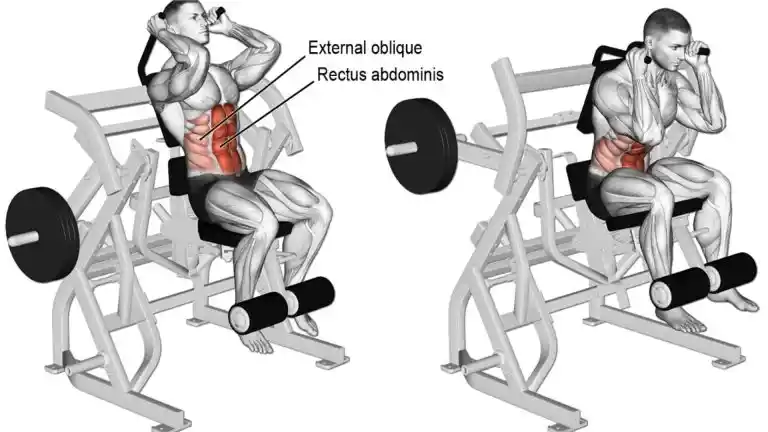
20. Machine Crunch
Doing crunch exercises with an ab machine is a great way to work your ab muscles and obliques.
Without a doubt, adding this movement to your workout regime will help you on your path to getting great abs.
This is a convenient way to add resistance to your ab work for better ab development. Depending on the machine’s design, your hands hold handles alongside your head or rest on the chest pad.
How To Do
- Sit on the ab machine and select a slight resistance.
- Position your feet under the pads and hold the handles at the top.
- Make sure your arms are bent at 90 degrees.
- Keep your feet stationary and perform crunches as instructed in the machine directions, focusing on the contraction of your abs.
- Pause and slowly return to the starting position as you inhale.
Tips
- Use a slow, controlled motion to target the muscles.
- Keep your motions slow and steady to reduce the risk of injury.
- Do not overload the machine. Go with the weights that you have worked with before and eventually build up.
The Anatomy Of Your Abs
Your waist comprises two muscle groups: the rectus abdominis (known as your “six-pack” muscles) In the front and the obliques on each side.
To build impressive six-pack abs, first, we needed to understand the anatomy and functionality of the abs, which help perform the exercises on the gym machine to the best level.
Rectus Abdominis
The rectus abdominis is a paired muscle running vertically down the front of the abdomen. It is commonly referred to as the “six-pack” muscle.
The two rectus abdominis muscles (one on each side) are encased in a sheath of fascia that forms the central dividing line down the middle of the abs.
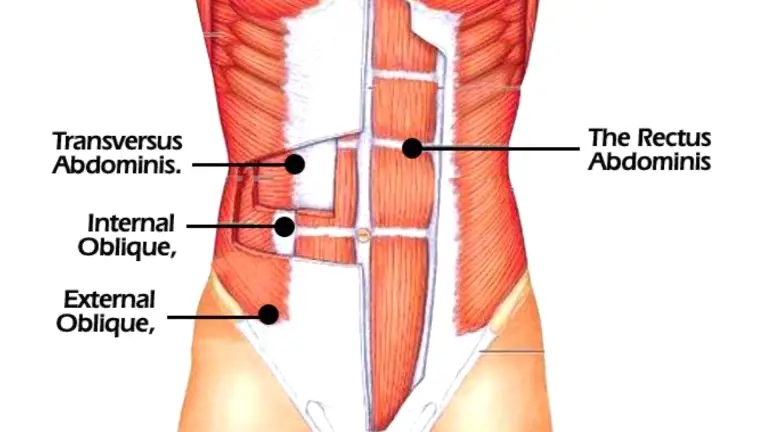
External And Internal Obliques
The external and internal obliques are located on the sides of the abdomen.
- The external oblique is the outer visible layer that passes diagonally on each side of the rectus abdominis.
- The internal oblique muscles lie under the external obliques and run into the lower back or erector spinae.
Transverse Abdominis
The transverse abdominis is the deepest layer of the abdominal muscles, running horizontally across the abdomen.
It acts as a natural corset, providing stability and support to the spine.
Core
The core comprises the abdominal muscles and the muscles of the lower back, hips, and pelvis, working together to stabilize and support the spine.
The abdominal muscles work in synergy with other core muscles to provide stability, transfer force, and maintain proper posture.
Design Your Abs Workout Plan
Designing an effective abs workout plan for men requires a combination of exercises that target all areas of the abdominal muscles, along with a progressive increase in intensity and complexity.
Below is a structured plan that covers beginner to advanced levels. It ensures a comprehensive approach to strengthening and toning the abs.
| Level | Sets | Reps | Frequency |
|---|---|---|---|
| Beginner | Start with 2-3 sets | 10-12 | 1-2 times per week |
| Intermediate | Increase to 3-4 sets | 12-15 | 2-3 times per week |
| Advanced | Aim for 4-5 sets | 15-20 | 3-4 times per week |
Sample Ab Workout Routines for Men
| Exercise | Sets | Reps |
|---|---|---|
| Crunches | 3 | 12 |
| Leg Raise | 3 | 10 |
| Plank (30 seconds hold) | 3 | – |
| Bicycle Crunches | 3 | 12 |
Sample Ab Workout Routine For Beginner
| Exercise | Sets | Reps |
|---|---|---|
| Reverse Crunches | 3 | 10-12 |
| Mountain Climbers | 3 | 10-12 |
| Side Plank (each side, 20 seconds hold) | 3 | – |
| Leg Raises | 3 | 8-10 |
Advanced Men Ab Workout Routines
| Exercise | Sets | Reps |
|---|---|---|
| Hanging Leg Raises | 4 | 10 |
| Russian Twists with Weight | 4 | 12 |
| Side Plank with Hip Dips | 4 | 10 |
| Dumbbell Side Bend | 3-4 | 12 |
| Bicycle Crunches | 3-4 | 12 |
FAQs
How often should I do ab workouts?
It is recommended to do ab workouts 2-4 times a week. Give your abs a break between workouts; it helps them recover and get stronger.
How many sets and reps should I do for ab exercises?
Starting with 2-3 sets of 10-12 reps per exercise is a good starting point for beginners.
As you progress to intermediate and advanced levels, you can increase the number of sets (3-5 sets) and reps (12-20 reps) to continue challenging your muscles.
Can I get a six-pack by doing ab workouts alone?
Ab workouts are important for building strong abdominal muscles, but getting a six-pack requires a combination of regular ab exercises, a balanced diet, and losing overall fat.
Reduce body fat through a healthy lifestyle and incorporate cardiovascular exercises and strength training to reveal those toned abs.
Can I do ab workouts every day?
While it may be tempting to work your abs every day, allowing your muscles time to recover and grow stronger is recommended. Try to do 2-4 ab workouts each week. On the other days, rest or work on other muscle groups.
How can I make my ab workouts more challenging?
You can make your ab workouts more challenging by adding weights, trying advanced variations of abs exercises, or extending the duration of exercises such as planks.
Conclusion
Congratulations on finishing our blog about ab workouts for men. These abs exercises are highly recommended for anyone who is interested in building abs muscles and gaining strength.
Remember, achieving strong abs requires dedication, consistency, and a balanced approach. Along with your ab workouts, you should also maintain a healthy diet, engage in regular cardiovascular exercise, and incorporate strength training.
Thanks for reading, enjoy your abs workout
Complete Abs Workout Routine For Men

Manish brings over 10 years of hands-on experience in weight lifting and fat loss to fitness coaching. He specializes in gym-based training and has a lot of knowledge about exercise, lifting technique, biomechanics, and more.
Through “Fit Life Regime,” he generously shares the insights he’s gained over a decade in the field. His goal is to equip others with the knowledge to start their own fitness journey.