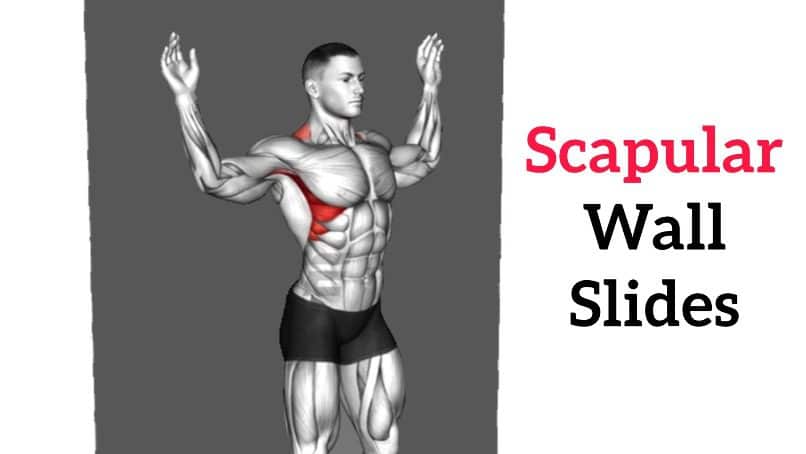
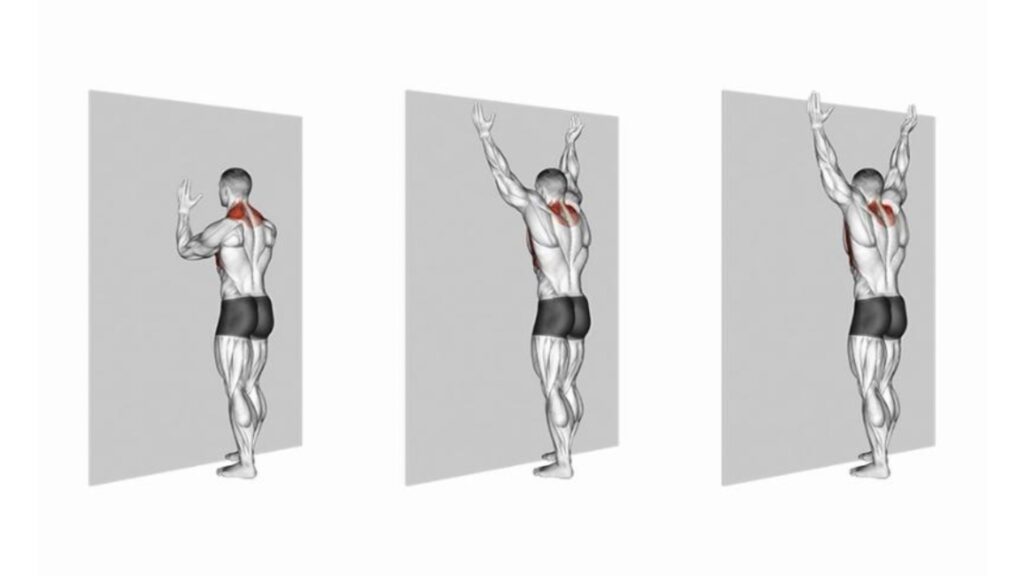
Scapular wall slides, also known as wall slides or reverse wall slides, are one of the basic and best exercises for improving shoulder rotation, upper back activation, and rotator cuff muscle strength and mobility.
Wall slides target the muscles responsible for scapular stability, such as the serratus anterior, lower trapezius, and rhomboid.
A study found that wall slide exercises improve scapular position and reduce tension on the upper trap muscle. They work the muscles surrounding the scapula and shoulder for dynamic and static stability.
Learn how to do the scapular wall slides correctly. You will also learn their benefits and how to avoid common mistakes.
Scapula Wall Slides Muscles Worked
The muscles involved in wall slides are:
- Main muscles during Rotator Cuff Muscles (shoulder)
- Secondary muscles: Trapezius, Rhomboids, and Levator Scapulae
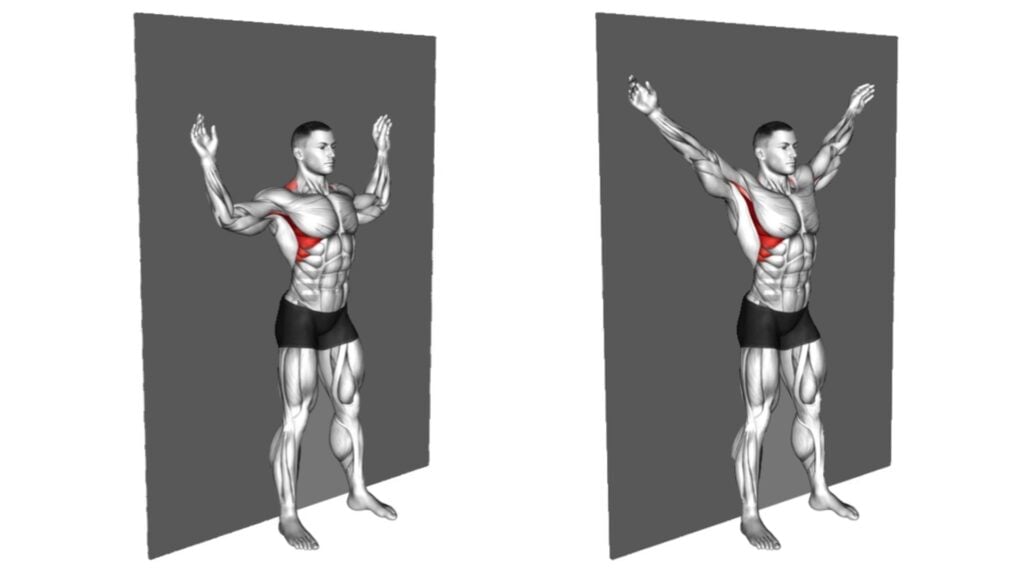
How To Do The Reverse Wall Slide
- Stand with your back straight against the wall.
- Keep your feet at least 6 inches, and keep the back of your head, shoulders, and butt against the wall.
- Make sure your knees aren’t fully locked.
- Slowly raise your arms up the wall until they are elevated above your shoulders and at 90-degree angles from your torso.
- Keep your chest open and your back tall, and gently squeeze the muscles in your midback as you slide your arms down toward your shoulders.
- Slowly slide your arms down the wall and keep them as close to the wall as you can.
- Hold this position for one count. Inhale and then push your arms back up to the starting position.
Common Mistakes to Avoid
While performing wall slides, it’s important to be aware of and avoid the following common mistakes:
- Avoid lifting or shrugging your shoulders towards your ears during the exercise. Keep your shoulders relaxed and down, concentrating on engaging the muscles around the shoulder blades.
- Maintain a neutral spine alignment throughout the exercise to avoid unnecessary strain on the lower back.
- Avoid tilting your head back excessively or jutting your chin forward. Keep your neck aligned with your spine and maintain a neutral position to prevent strain on the neck muscles.
- Make sure you do the wall slides slowly and carefully to work the targeted muscles.
- Remember to breathe throughout the exercise. Inhale as you slide your arms up the wall, and exhale as you lower them.
- You can make Scapular wall slides easier by taking the feet a few inches away from the wall.
- To make Scapula slides harder, you can increase the number of sets and the number of times you do them. Or you can do scapular wall slides with a resistance band.
1. Forearm Wall Slide
The forearm wall slide is an exercise that targets the muscles of the upper back, shoulders, and forearms. It involves moving the forearms up and down a wall while keeping the elbows and wrists in contact with it.
This exercise offers unique benefits and can help improve posture, shoulder mobility, and forearm strength.
How To Do
- Stand facing a wall and keep your feet hip-width apart.
- Touch the wall with your forearms and shoulder width apart.
- The elbows are bent at 90 degrees, and the wrists are next to the elbows.
- Ensure your elbows, wrists, and palms are in contact with the wall throughout the exercise.
- Slide your arms up the wall as far as possible while keeping in contact with the wall.
- Pause briefly at the top of the movement, then slowly slide your arms back to the starting position.
2. Mini Resistance Band Wall Slide
Using a resistance band for the wall slides is a great way to strengthen upper back muscles. You can use different resistance levels to see how strong you are getting.
But, don’t use a resistance band that’s too tight. If the band is too tense, you can use other muscles instead of the rotator cuff muscles.
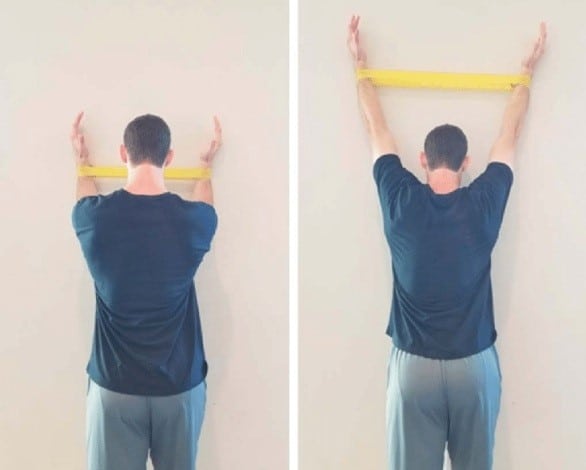
How To Do
- Place the mini band around your forearms, just above your wrists.
- Round your shoulders forward slightly, maintaining contact between your elbows and the wall.
- This position ensures that your scapulae are engaged and protracted.
- Slide your forearms upward along the wall while keeping your elbows in contact with the wall.
- Imagine that you are trying to raise your forearms from shoulder height to eye level.
- Slowly and in a controlled manner, slide your forearms back to the starting position.
3. Foam Roller Wall Slide
You don’t need special gym equipment to practice the scapular wall slide workout Only FOAM roller is enough.
This exercise will help reduce pain and discomfort in the upper back and shoulders by improving shoulder strength and stability.
The beginner can try scapular wall slides to strengthen the upper back muscles and improve scapular strength and mobility.
Benefits Of Foam Roller Wall Slide
- Strength Serratus Anterior
- Strength Lower Trapezius
- Strength Upper Trapezius
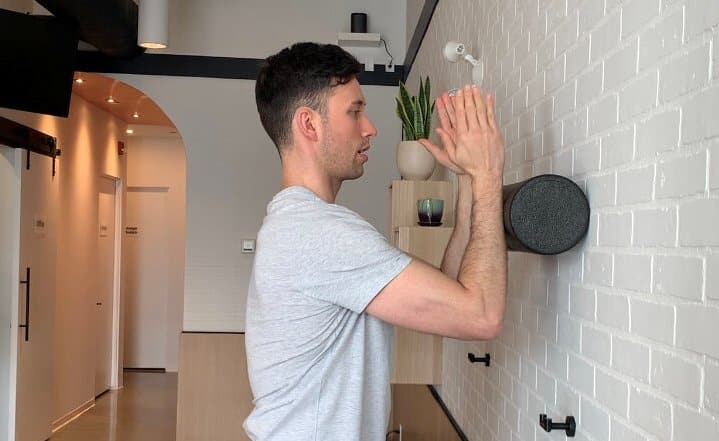
How To Do
- Stand facing a wall with a foam roller between your forearms just below shoulder height.
- Push your elbows into the foam roller while pushing your shoulder blades forward.
- Keep this pressure as you roll the foam roller upwards and back downwards to the starting position.
Know More: Best Foam Roller Exercises For Shoulder And Neck
4. Single Arm Wall Slide
It helps you strengthen each arm individually, improve muscle balance, and fix any asymmetries or weaknesses.
It calls on strength in the serratus anterior, full range of motion. They also stretch the front of your shoulders and chest muscles, while strengthening the muscles in the back of your shoulders (rear delt). This helps prevent the tendency to cave in the chest and slouch the shoulders while sitting.
How To
- Extend one arm forward and forearm against the wall.
- Slide your arm up the wall and stay in contact with the wall while you move.
- Then stop for a moment and move your arm back down to where you started.
- Complete the desired repetitions for one arm before switching to the other.
References
- Park SY, Ahn TK, Eom JH, Youn HJ, Kim IK, Yoo WG. Scapulothoracic Muscle Activity during Use of a Wall Slide Device (WSD), a Comparison with the General Wall Push up Plus. J Phys Ther Sci. 2014 Jun;26(6):805-6. doi: 10.1589/jpts.26.805. Epub 2014 Jun 30. PMID: 25013271; PMCID: PMC4085196.
- Lunden JB, Braman JP, Laprade RF, et al.: Shoulder kinematics during the wall push-up plus exercise. J Shoulder Elbow Surg, 2010, 19: 216–223

Manish brings over 10 years of hands-on experience in weight lifting and fat loss to fitness coaching. He specializes in gym-based training and has a lot of knowledge about exercise, lifting technique, biomechanics, and more.
Through “Fit Life Regime,” he generously shares the insights he’s gained over a decade in the field. His goal is to equip others with the knowledge to start their own fitness journey.