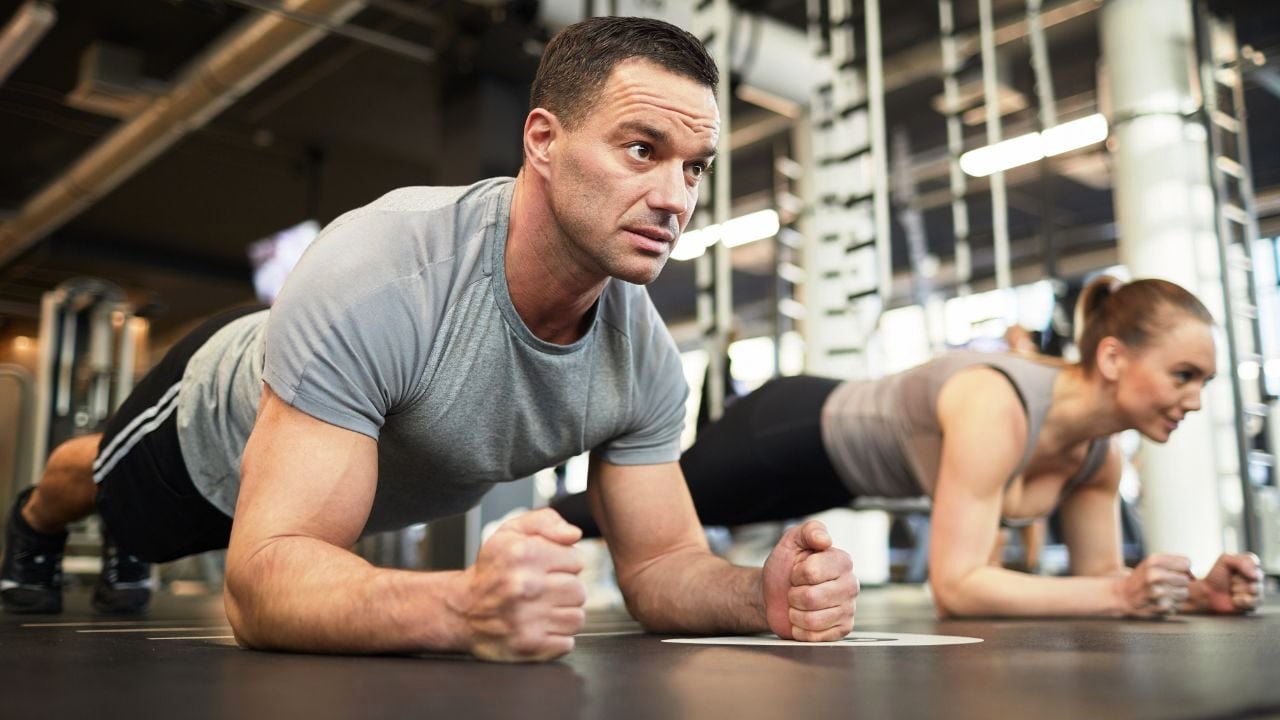
The plank is a brilliant bodyweight exercise that helps you to develop the strength and stability of your core.
The plank is primarily a strength-building exercise rather than a cardio exercise. It can also help you burn calories.
There are many different ways to do the plank, such as on the forearm, on one side, or in reverse condition.
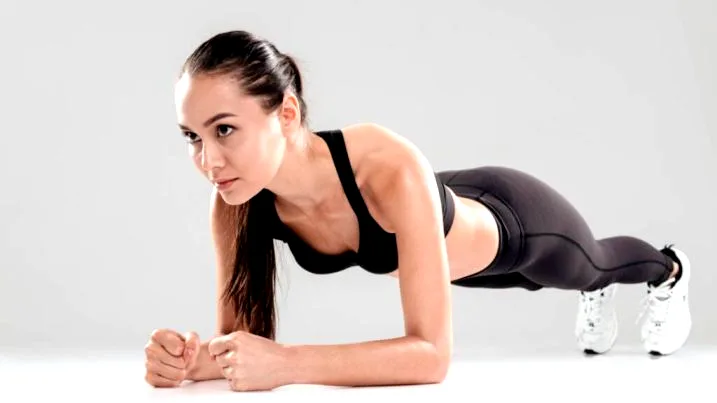
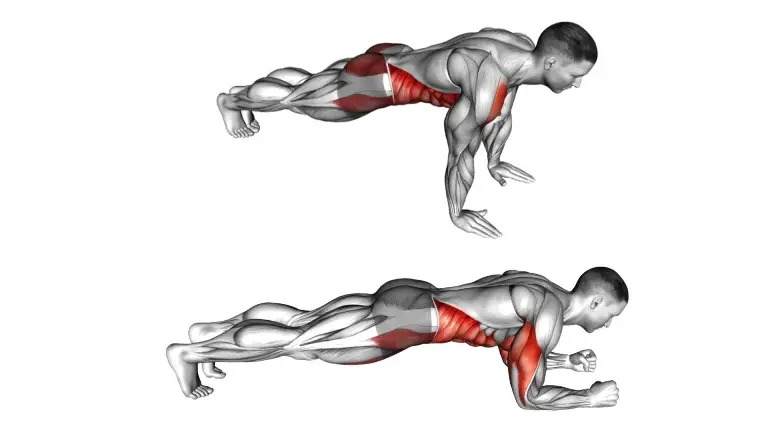
The most common plank is the forearm plank, which is held in a push-up-like position, with the body’s weight borne on forearms, elbows, and toes.
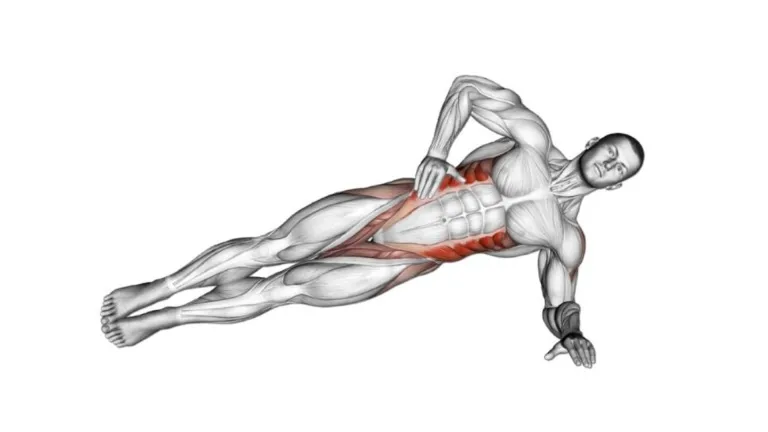
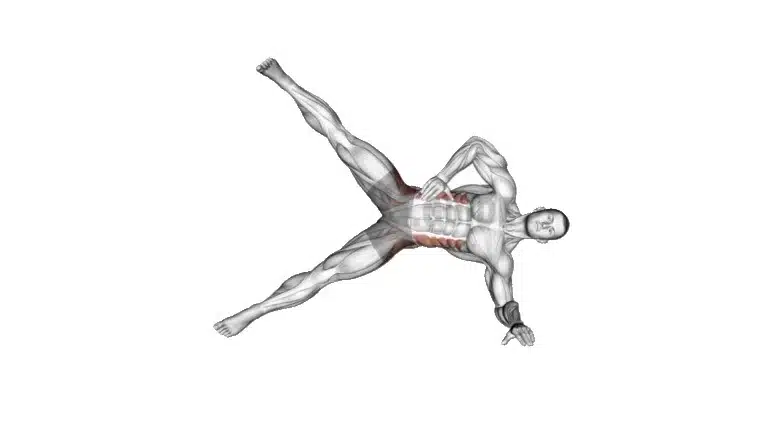
The side plank is a great exercise for strengthening the oblique and abs muscles. Strong obliques can be quite useful as core stabilization muscles.
In this article, we will discuss the following
- What is Plank (Definition)
- Muscles Worked During Plank Exercises
- Benefits of Planking
- How To Do Forearm Plank With Proper Foam and Technique
- The best variation of the plank for beginner, intermediate and Advance.
- What is Plank
- Muscles Worked During Plank Exercises
- Muscles Worked During Front Plank Include
- Muscles Worked During The Side Plank Include
- Benefits Of Doing The Plank Exercise
- 1. Strengthen Upper And Lower Body Muscles In One Go
- 2. Prevent Muscle imbalances
- 3. Improve Functional Movement
- 4. Provide a Safe and Effective Alternative to Crunches and sit-ups.
- 5. Burn Calories and Fat
- 6. Versatile exercise
- Forearm Plank
- How To Do Forearm Plank
- Techniques and Tips For The Perfect Plank
- Best Plank Exercise Variation
- 1. Knee Plank
- 2. High Plank
- 3. Plank Reach
- 4. Plank to Push Up
- 5. Weighted Front Plank
- 6. Side Plank On Knee
- 7. High Side Plank
- 8. Forearm Side Plank
- 9. Side Plank and Rotate
- 10. Plank with Arm Extension
- 11. One-Leg Plank
- 12. Forearm Side Plank Crunch
- 13. Alternating Superman Plank and Reach
- 14. Spiderman Plank
- 15. Plank Toe Taps
- 16. Plank Jack
- 17. Plank Shoulder Tap
- 18. Plank Row
- 19. Lateral Plank Walk
- 20. Side Plank with Hip Abduction
- 21. High Reverse Plank
- 22. Stability Ball forearm Plank
- 23. Stability Ball forearm Side Plank
- 24. Stability Ball Tuck
- 25. Medicine ball High plank
- Frequently Asked Questions
- What is plank exercise good for?
- Do planks flatten the tummy?
- How many calories does plank burn?
- What happens if I do a plank every day?
- How Long to Hold a Plank?
- Conclusion
- Disclaimer:
- References
What is Plank
The plank, or planking, is an isometric core strength exercise that involves maintaining a position similar to a push-up. It is an exercise that strengthens your core muscles and improves your balance and endurance.
The exercise is referred to as the ‘plank’ because it requires you to maintain a straight and rigid posture, similar to that of a plank of wood.
The plank is a bodyweight exercise where you hold your body in a straight line off the ground. Planking is a static exercise that works multiple muscle groups at the same time.
This helps you strengthen your core and also works your shoulders, arms, and glutes. They are also an effective prevention method against back pain.
The plank exercise has many variations, including the Forearm plank, high plank, side plank, and reverse plank. These variations target different muscle groups and challenge your core in different ways.
Want To Build 6 Pack ABS: Use Our Free Calculator To Know Your Fat Loss Calories Requirement
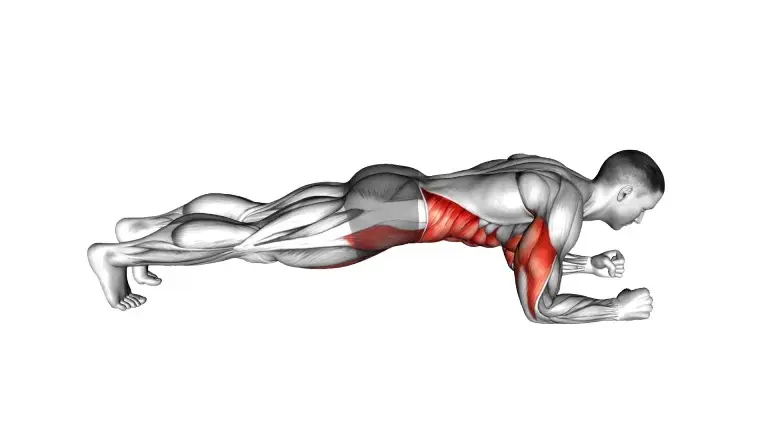
Muscles Worked During Plank Exercises
The plank position makes an effective component for your workout, as it engages a wide range of major muscle groups.
The primary areas affected are the abs and back and the transverse abdominus.
In addition, the position uses the trapezius, rhomboids, deltoids, and pectoral muscles, of the upper body, as well as the gluteus maximus and quadriceps of the lower body.
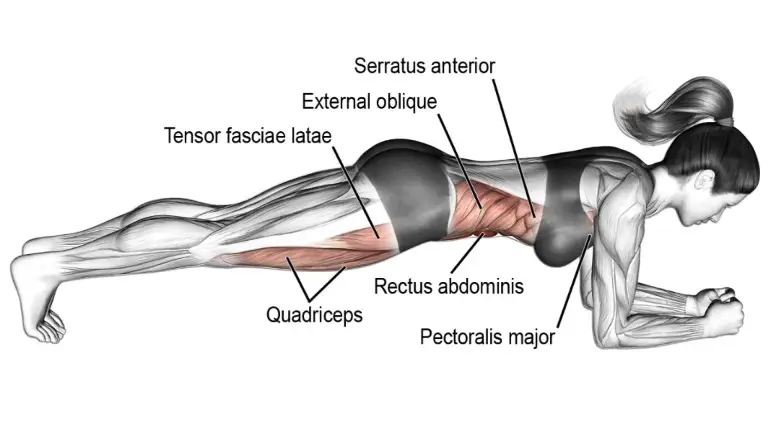
Muscles Worked During Front Plank Include
- Primary muscles worked: erector spinae, rectus abdominis (abs), and transverse abdominis.
- Secondary muscles worked: trapezius (traps), rhomboids, rotator cuff, the anterior deltoid, lateral deltoid and posterior deltoid muscles, pectorals (pecs), serratus anterior, glutes, quadriceps, and calf.
Muscles Worked During The Side Plank Include
- Primary muscles worked:: External and internal obliques, transversus Abdominis, abdominis, and hip muscle.
- Secondary muscles worked: gluteus maximus (glutes), quadriceps (quads), and hamstrings.
Benefits Of Doing The Plank Exercise
A plank workout is one of the best exercises for strengthening your core. When you hold the plank position, your biceps, neck, and shoulder muscles are also worked and stretched.
1. Strengthen Upper And Lower Body Muscles In One Go
When you perform plank exercises, you work all the muscles that make up your core strong. And you will gain all of the benefits that come with building a strong core.
In addition to working the core, plank exercises also work the following muscles:
UPPER BODY
- Trapezius
- Rhomboid major and minor
- Rotator cuff
- Anterior, medial, and posterior delts
- Pectorals
- Triceps
- Biceps
LOWER BODY
2. Prevent Muscle imbalances
It’s easy to develop muscle imbalances when only performing abdominal exercises (such as sit-ups and crunch). Few people strengthen their spine and glutes to compensate for the abdominal work.
Planks condition the front and back of the body simultaneously. When muscles are comparably developed on both sides of the body, the result is better posture, more spinal support, and less lower-back pain.
3. Improve Functional Movement
Planks are important for functional movement, which is an important part of life.
Things such as squatting, bending, running, lifting, jumping, and throwing are all functional movements initiated in the core.
4. Provide a Safe and Effective Alternative to Crunches and sit-ups.
Crunches and sit-ups only work the muscles on the front side of the core, so it’s necessary to do back strengthening exercises as well. However, planks work the entire core, as well as many other muscles in the body.

5. Burn Calories and Fat
One of the major benefits of the plank exercise is its effectiveness at targeting belly fat. Just a few minutes of planking per day can significantly reduce stubborn belly fat over time.
The plank is a combination of a strength and cardiovascular exercise. You can burn calories and regulate your weight by doing plank exercises.
If you want to lose weight and get a flat stomach, planks are an easy and effective way to do this.
6. Versatile exercise
The best thing about planks is that there are countless variations of the exercise, ranging from traditional and side plank variations to planks using external weights or unstable surfaces.
There is a plank routine for everyone and every fitness level. If one option doesn’t work for you because of injury, body type, imbalance, or lack of strength, you can try another one. It is possible to program entire workouts around the plank.
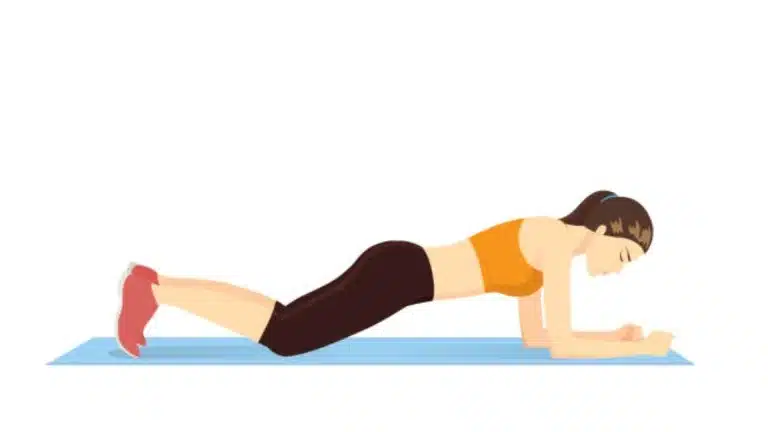
Forearm Plank
The most common plank is the forearm plank, which is held in a push-up-like position, with the body’s weight borne on forearms, elbows, and toes.
The forearm plank is an effective exercise for building core strength and stability. It targets the transverse abdominis, rectus abdominis, and other core muscles.
To make the exercise more difficult, raise one leg off the ground and hold this position before repeating with the other leg.
How To Do Forearm Plank
Follow these instructions to learn how to do a perfect plank. Once you’ve read the step-by-step instructions, you’ll be ready to do the exercise.
- Lie face down on an exercise mat with your elbows to your sides, your head facing forward, and palms flat on the floor.
- Start to get in a push-up position, bend your elbows and rest your weight on your forearms instead of on your hands.
- Your body should form a straight line from your shoulders to your ankles.
- Brace your core by contracting your abs as if you were about to be punched in the gut.
- Hold this position for a set amount of time.
- Then do 3-4 more sets.
BODY FAT % CALCULATOR: KNOW YOUR BODY FAT PERCENTAGE TO GET VISIBLE ABS
Techniques and Tips For The Perfect Plank
When you’re first starting out, it can be helpful to focus on proper form and technique. Here are the most common plank mistakes and step to fix them.
It takes practice to perform planks correctly, and until your muscles get a little stronger, it will be very challenging.
- Do not let your lower back sag or your butt rise. Ensure your body is straight and rigid.
- Keep your glutes and core muscles contracted.
- Your neck should be in line with your body, not tilted up, which could strain the neck. Keep your gaze down at the floor.
- For the beginner, try holding the plank position for 10-20 seconds. Over time, work up to 30, 45, or 60 seconds.
- Don’t focus too much on the stopwatch, quality trumps the quantity. When your form begins to suffer, it is time to give up.
- Although it’s important to concentrate on perfect form, don’t forget to breathe, as lack of oxygen can cause dizziness or nausea.
Best Plank Exercise Variation
There are several variations of the plank that further work the core muscles to build strength and stability. There are also ways to modify it if you are a beginner.
You can do planking in different ways to suit your fitness level.
- If you are new to performing planking, you may want to apply a few modifications to make the exercise easier. One way to counter this problem is to do knee plank and side plank on knee. Another way to make it easier is to hold plank position for less time.
- If you want to move from beginner level to intermediate level, you should try: Side Plank Rotation, Side Plank Crunch and Plank Push Up.
- If you are looking for a more advanced variation to stimulate different muscle fibers in the core, then try weighted front plank, alternating superman plank and Stability ball forearm plank.
Know More: Safe And Fast Ways To Lose Weight (Backed By Science)
1. Knee Plank
The knee plank is the beginner version of the forearm plank exercise. The knee plank works the core and makes it stronger. It also helps relieve stress on the lower back.
Once you master the plank on your knees, you can move up to a full forearm plank.
- Level: Beginners
How To Do
- Lie faces down on an exercise mat with your elbows to your sides, your head facing forward, and palms flat on the floor.
- Bend your knees and rise up onto your knees so that only your forearms and knees are touching the floor.
- Your body should be straight and a few inches off the floor.
- Brace your core by contracting your abs.
- Hold this position for 10-30 sec.
2. High Plank
The high plank exercise, also known as the full plank exercise, is the cornerstone of all plank variations. The ability to hold a stable full plank is a benchmark for physical fitness and core strength.
It’s important to practice proper technique as you build the strength necessary to perform a full plank and modifications of it.
A full plank is a foundational exercise that can be used to progress into exercises involving external weight and unstable surfaces such as stability balls and medicine balls.
- Level: Beginners To Intermediate
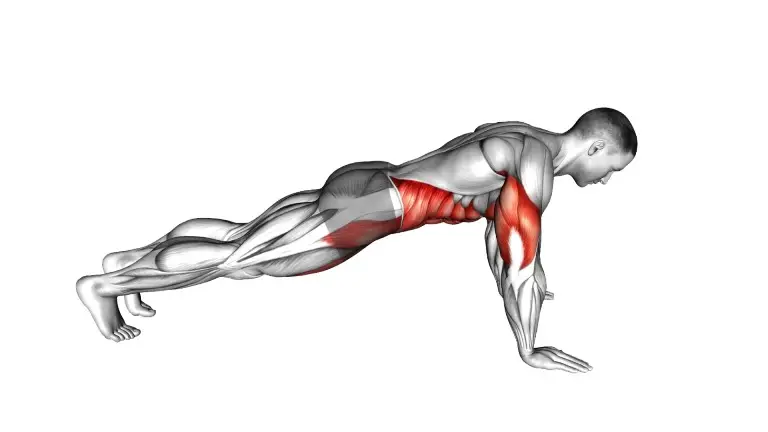
How To Do
- Start to get in a push-up position, lift your knees off the ground and step your feet back so that your legs are straight and fully extended.
- Keep your core, butt, and quads tight, and avoid arching your back.
- Your body should form a straight line from your shoulders to your ankles.
- Brace your core by contracting your abs.
- Hold this position for a certain amount of time.
3. Plank Reach
Plank reach requires a great deal of core stabilization strength and balance. This move is a moving forearm plank that forces you to activate your core as you move to different positions.
- Level: Intermediate To Advanced
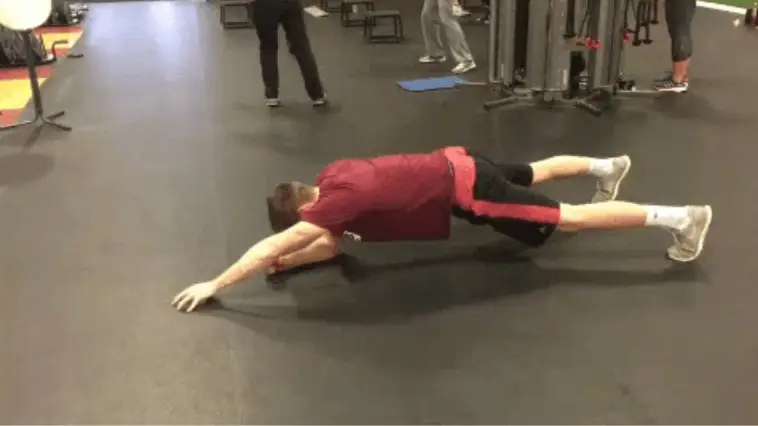
How To Do
- Start in a forearm plank
- Your body should form a straight line from your shoulders to your ankles. Brace your core.
- Reach forward with your right hand and tap the floor in front of you. Put your forearm back in the starting position.
- Then reach forward with your left hand and tap the floor in front of you. Return to the starting position.
- Continue alternating as quickly as you can.
4. Plank to Push Up
There is a plank and push up combo used in a plank to push-up exercise. The move takes a standard plank to the next level by adding an element of controlled, moving arm work.
Maintaining a plank position, you alternate between a forearm plank and a high plank. This exercise serves as an excellent core strengthener.
- Level: Intermediate To Advanced
How To Do
- Start in a forearm plank.
- Keep your core, butt, and quads tight, and avoid arching your back.
- Press your body up into the top position of a push-up by extending your arms one at a time.
- Pause, then reverse the movement and return to your elbows. That’s 1 rep
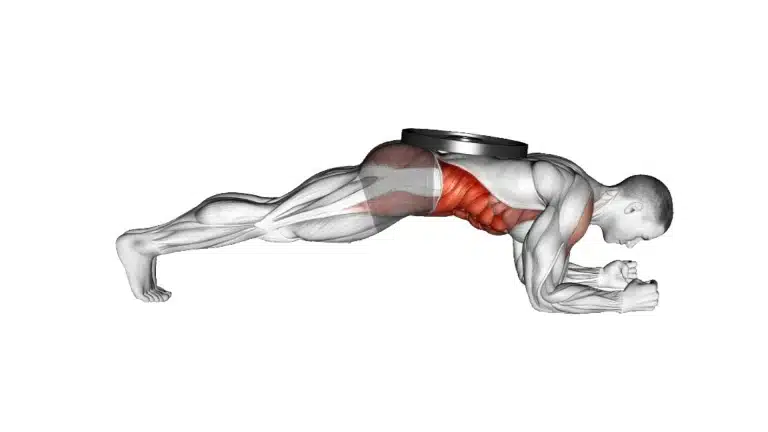
5. Weighted Front Plank
If you feel prepared to increase the intensity of your plank exercises, you can add a weighted plank to your workout routine.
Weighted planks work better than bodyweight ones and will help you build a strong core, strengthen your abdominal muscles, and show six-pack abs.
- Level: Intermediate To Advanced
How To Do
- Start in a front plank.
- Your body should form a straight line from your shoulders to your ankles. Tighten your stomach muscles.
- Have your spotter place a weight plate on your back.
- Hold front plank position with the weight plate on your back.
- Hold this position for a set amount of time.
- Have your spotter take the weight plate off your back.
6. Side Plank On Knee
The side plank on the knee is a less difficult version of the side plank exercise. If you’re new to planking, you should master this modified knee side plank before moving on to the side plank variation.
Side planks strengthen your obliques and entire core. Side planks not only build strength in your shoulder and arm, but also in your oblique and hip muscles.
- Level: Beginners
How To Do
- To do a side plank, lie on your left side on the floor with your right knee on your left knee.
- Raise your body by placing your right forearm flat on the floor so that it’s perpendicular to your torso.
- Lift your torso until your left upper arm is straight underneath you, with your elbow bent 90 degrees and your forearm flat on the floor.
- In this position, only your left arm and knee touch the floor.
- Your body forms a straight line that is about 20 degrees away from the floor.
- Keep your abs pulled in tight and hold this position for as long as you can, and then repeat on the left side.
7. High Side Plank
A High side plank strengthens your obliques and helps you work your way to a flatter tummy and stronger back.
A side plank exercise is definitely a way to shape and tone your waistline, but it also targets your hips, core, and all stabilizer muscles.
It challenges your balance by requiring these stabilizers to activate and work as you hold your plank and pull your muscles in.
- Level: Beginners To Intermediate

How To Do
- Get in a side plank position.
- Raise your body by placing your left palm flat on the floor so that it’s perpendicular to your torso.
- Lift your torso until your left arm is straight underneath you.
- In this position, only your left arm and the left foot are making contact with the floor.
- Hold this position for as long as you can, and then repeat on the right side.
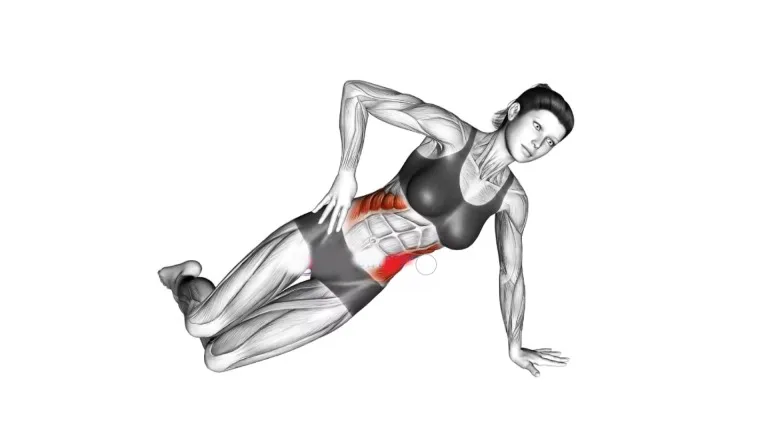
8. Forearm Side Plank
The forearm side plank is a great exercise for strengthening the abs and oblique muscles, which don’t get worked as much during crunches.
The Forearm side plank works the hips, legs, and feet muscles to improve balance and proprioception.
If you find it hard to hold a side plank, that’s OK. You can try doing the exercise from your knees instead of your feet.
- Level: Beginners To Intermediate
How To Do
- Get in a side plank position.
- Raise your body by placing your left forearm flat on the floor so that it’s perpendicular to your torso.
- Lift your torso until your left upper arm is straight underneath you, with your elbow bent 90 degrees and your forearm flat on the floor.
- In this position, only your left forearm and the outer side of your left foot are making contact with the floor.
- The diagonal line is formed by your body at an angle of 20 degrees.
- Hold this position for as long as you can, then repeat on the right side.
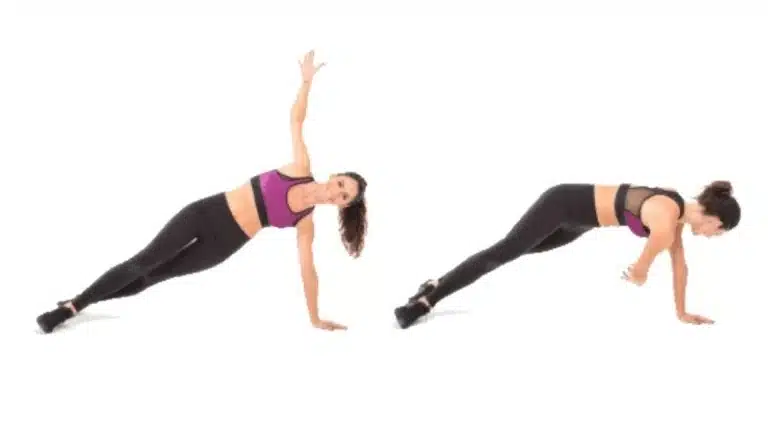
9. Side Plank and Rotate
The side plank with rotation exercise develops core and shoulder strength & stability, and may even help improve spinal mobility.
To optimize these benefits, make sure that you’re doing this exercise in perfect form.
- Level: Intermediate To Advanced
How To Do
- Get in a side plank position.
- Raise your body by placing your left arm (palm) flat on the floor so that it’s perpendicular to your torso.
- Lift your torso until your left upper arm is straight underneath you.
- In this position, only your left arm and the outer side of your left foot are making contact with the floor.
- Reach under and behind your torso with your right hand, keeping your abs braced.
- Then repeat on the right side.
10. Plank with Arm Extension
Simply holding a plank position is a challenging exercise for your abs and core.
Plank with arm extension doubles the difficulty by asking you to hold that position with one arm raised in front of your body.
The main goal of this great core exercise is to raise one arm off the floor so that your fingers are pointing straight ahead with your palm facing inward.
- Level: Intermediate To Advanced
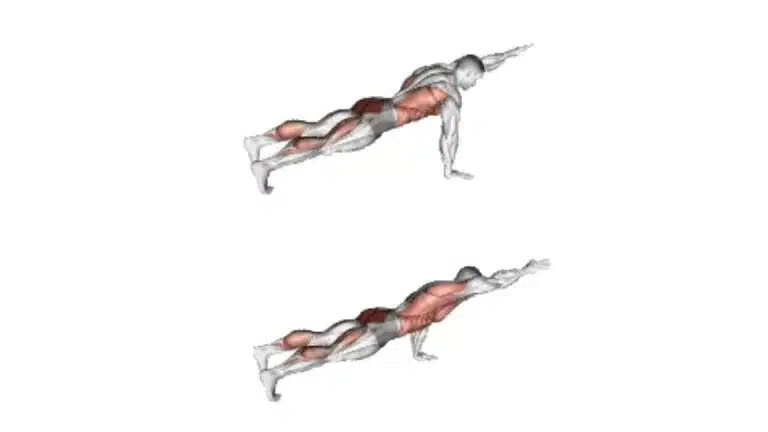
How To Do
- Start to get in a push-up position.
- Your body should be straight from your shoulders to your ankles.
- Raise and straighten your right arm, and hold it so that it’s parallel to the rest of your body.
- Hold this position for a set amount of time and slowly lower to the starting position.
- Then raise your other arm and repeat.
11. One-Leg Plank
The classic plank exercise is cool and all, but plank leg raises really take it to the next level. Adding leg raises (aka leg lifts) can boost the intensity and activate more of your abdominal and lower-body muscles.
Adding leg raises can help activate your ab muscles more than regular planks. With a strong core comes good posture, better balance, and even a healthier back.
- Level: Intermediate To Advanced
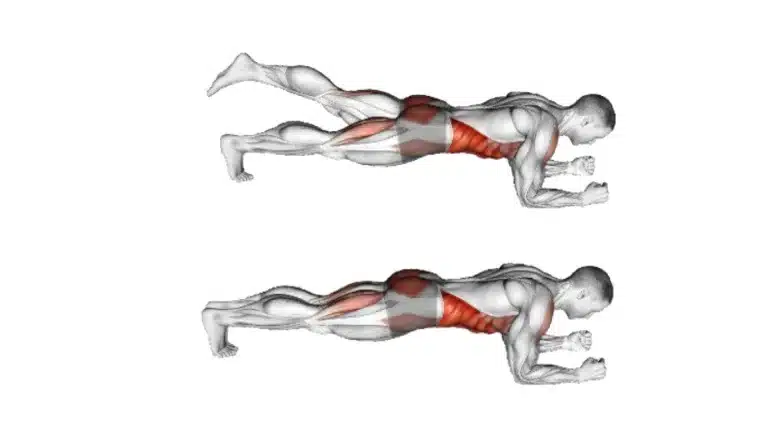
How To Do
- Lie faced down on an exercise mat with your elbows to your sides, your head facing forward, and palms flat on the floor.
- Start to get in a push-up position, bend your elbows and rest your weight on your forearms instead of on your hands.
- Raise one foot a few inches off the floor and hold. Hold this position for a set amount of time.
- Lower your foot and repeat with your other foot.
12. Forearm Side Plank Crunch
Combine your standard oblique crunches with side plank exercise into one move that will challenge your balance, tone up your waist, and strengthen your core.
Side plank crunches work your whole body by combining all the core actions you get from a traditional plank with some extra love for your shoulders and hips.
Your obliques get hit doubly hard in this exercise: The side closest to the ground has to stay engaged the whole time to keep the body stable, while the side you’re crunching contracts and relaxes over and over again.
- Level: Intermediate To Advanced

How To Do
- Get in a side plank position.
- Raise your body by placing your left forearm flat on the floor so that it’s perpendicular to your torso.
- Lift your torso until your left upper arm is straight underneath you.
- Lift your right leg and drive your knee toward your torso.
- At the same time, bring your right arm in toward your knee in a crunch movement.
- Continue for a set amount of time, and then repeat on the other side.
13. Alternating Superman Plank and Reach
The Superman Plank is an isometric training exercise. Before training with this plank variation, you should know how to do the more basic planks.
The Superman plank increases the core-strengthening benefits of a regular plank by balancing on only two limbs. Stability demands increase when the opposite arm and leg are extended.
Anyone looking for an advanced plank variation can use the Superman plank.
- Level: Intermediate To Advanced
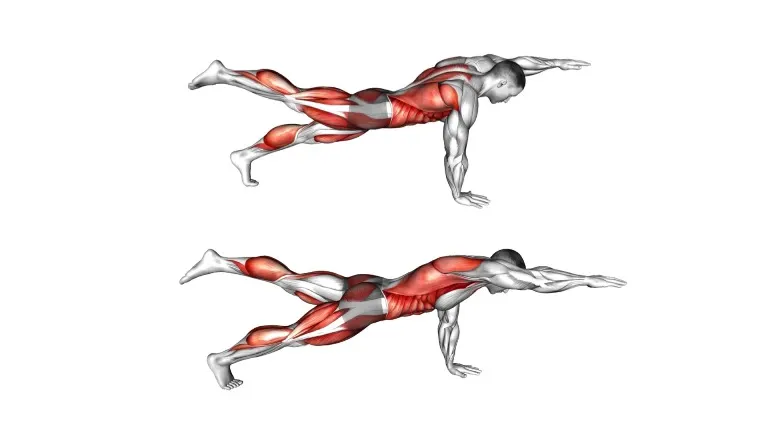
How To Do
- Lie faced down on an exercise mat with your elbows to your sides, your head facing forward, and palms flat on the floors.
- Your body should form a straight line from your shoulders to your ankles. Brace your core by contracting your abs.
- Raise your right foot and left arm off the floor and hold. Hold this position for a set amount of time.
- Return to the floor and repeat with your left foot and right arm.
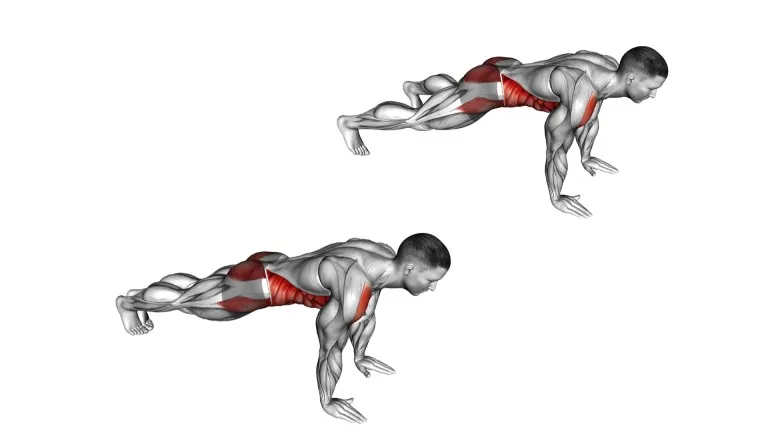
14. Spiderman Plank
Spiderman plank workout is a very challenging and effective way. It will strengthen the core and flatten your stomach.
Unlike a regular plank that revolves around a static position, the spiderman plank variation involves dynamic movement.
Adding a dynamic movement to plank exercises is a great way to make the abs and oblique work extra hard.
- Level: Intermediate To Advanced
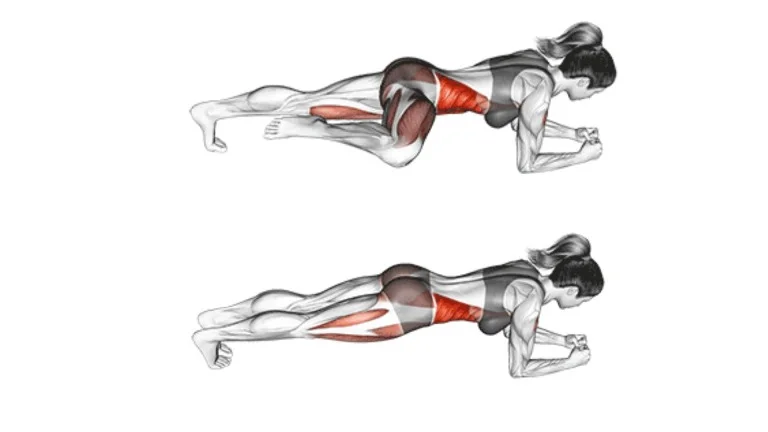
How To Do
- Start to get in a push-up position, bend your elbows and rest your weight on your forearms instead of on your hands.
- Your body should form a straight line from your shoulders to your ankles.
- Bring your right foot forward and place it next to your right hand (or as close as you can).
- Return your leg to the starting position and repeat with your left leg.
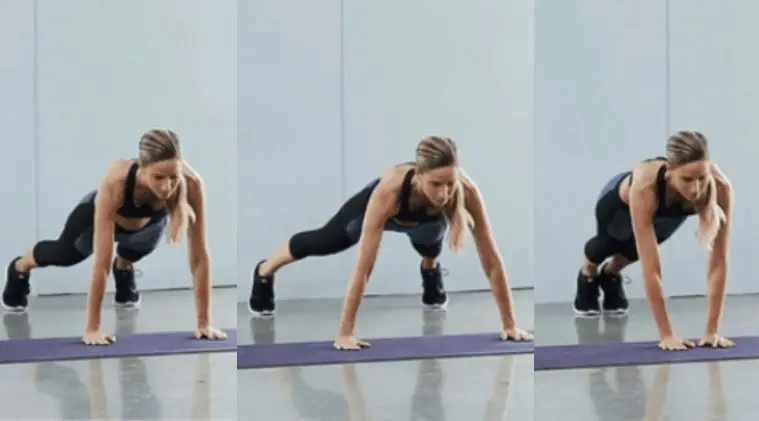
15. Plank Toe Taps
When done correctly, the plank with toe taps can effectively target your arms, core, neck, upper body, lower body, and waist.
Stepping your foot out to the side also works your hip abductors, the muscles on the outside of the glutes that are responsible for taking your legs away from your body. They also help keep your hips stable when you run.
- Level: Intermediate To Advanced
How To Do
- Start in a high plank position.
- Brace your core by contracting your abs.
- Step your right foot a few inches out to the right. Then, bring it back to the starting position. Step your left foot a few inches out to the left.
- Then, bring it back to the starting position.
16. Plank Jack
The plank jack is a combination of two very common exercises: the plank and the jumping jack.
It is a combination of cardio and core-strengthening exercises. They can help you strengthen the muscles of both the upper and lower body.
Adding plank jacks to your exercise routine a few times a week may also increase core strength and stability, burn calories, and help reduce fat.
- Level: Intermediate To Advanced
How To Do
- Start in a high plank position with your palms flat on the floor, hands shoulder-width apart.
- Your body should form a straight line from your shoulders to your ankles.
- Jump your feet out to the sides and back in (like jumping jacks).
- Keep your hips stable so that they do not bounce up and down as you jump your feet in and out.
- Continue for a set amount of time.
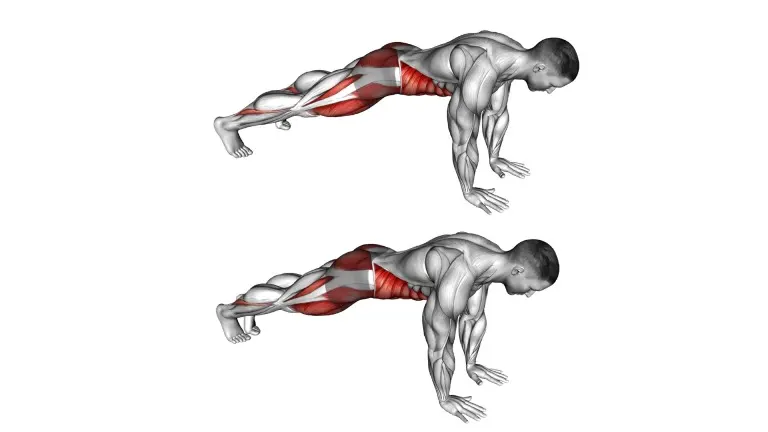
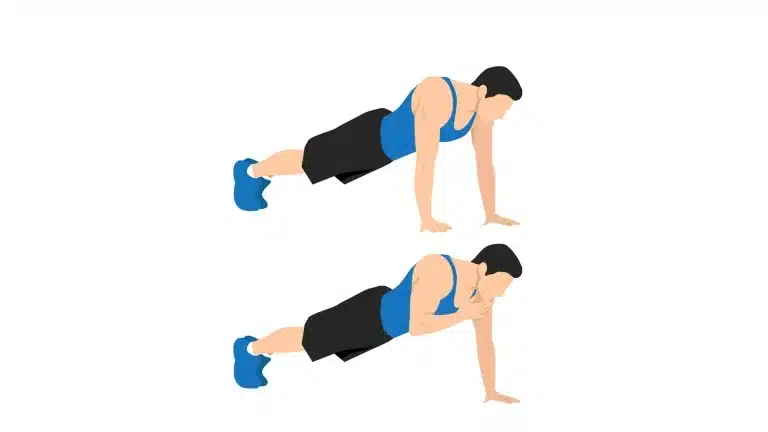
17. Plank Shoulder Tap
The plank shoulder taps exercise trains and strengthens your core, glutes, arms, wrists, and shoulders. This exercise helps to reduce lower back pain, improves your posture and flexibility, and tightens your midsection.
The unilateral aspect of this helps make sure you’re working both sides of your body equally. If you find your hips rocking during this move, you can widen your legs for balance.
- Level: Intermediate To Advanced
How To Do
- Start in a high plank position.
- Brace your core by contracting your abs.
- Tap your left hand to your right shoulder while engaging your core and glutes to keep your hips as still as possible. Try not to rock from side to side.
- Do the same with your right hand to your left shoulder. That’s 1 rep.
18. Plank Row
The plank row is also known as a renegade row, which is almost a variation of the dumbbell row exercise. It is designed to target the upper back, chest, abs, and oblique. Like a plank, it is designed to target the core.
The renegade row is a multitasking exercise that tones your back and works your core, while also testing your balance and stability.
- Level: Intermediate To Advanced

How To Do
- Place two dumbbells on the floor about shoulder-width apart.
- Start in the top position of a push-up position with your hands on the weights.
- Pull right elbow back, raising dumbbell toward chest.
- Hold for one second at the top and slowly return the weight to the starting position. Repeat on the other side.
- Complete the desired number of repetitions.
19. Lateral Plank Walk
The Lateral Plank Walk is a full-body exercise that mainly targets your core and shoulders. Take a walk on the wild side as well, as wild as a plank can get.
This move intensely engages your core like a classic plank, but the side-to-side motion works your arms and delts, too. Plus, it’ll challenge your balance and stability.
The faster you “walk,” the more challenging this will be cardiovascular. Slow down if you need to dial down the intensity a bit.
- Level: Intermediate To Advanced
How To Do
- Start in a high plank position.
- Your body should form a straight line from your shoulders to your ankles.
- Take a step to the right starting with your right hand and right foot and following with your left hand and foot.
- Do a set number of reps in one direction, and then repeat the same number of reps moving in the opposite direction.
20. Side Plank with Hip Abduction
The side plank hip abduction is an advanced variation of the side plank exercise that you can do to target the obliques and outer thighs.
The hip abductors move the legs away from the body and rotate them at the hip joint so this plays an important role in keeping your knee and hip joints stable.
- Level: Advanced
How To Do
- Lie on the floor, on your left side, side with your elbow directly beneath your shoulder and legs stacked. Place your free hand on your hip.
- Straighten your body and legs. Your feet should be together, and your hip should be resting on the floor.
- Lift your hips off the floor and brace your abs until you are balancing on your forearm and feet and your body forms a diagonal line.
- Lift your right leg at least 6 inches. Slowly bring your feet back together and lower your hip to the floor.
- Repeat on your right side.
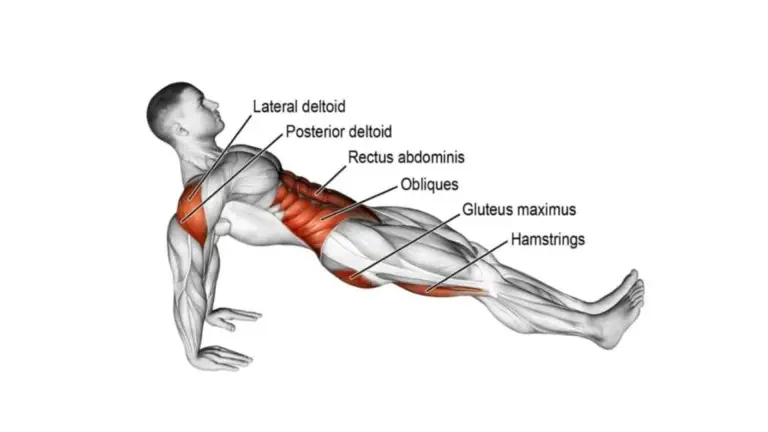
21. High Reverse Plank
The reverse plank exercise is an often-overlooked exercise that is great for the core. It is a great bodyweight exercise for strengthening your core and the key muscles of your posterior chain, namely, your erector spinae, gluteus maximus, and hamstrings.
Beginners should start with learning the regular plank. Progress to holding the reverse plank for just a few seconds at a time with good form.
The direction in which your fingers point while performing the high reverse plank doesn’t matter. You can point them forward, sideways, backward—whichever is most comfortable for you.
Make the high reverse plank more difficult by placing a weight on your abdomen and/or elevating your feet so that your body is horizontal.
- Level: Intermediate To Advanced
How To Do
- Sit on the floor with your legs extended in front of you.
- Place your palms, with fingers spread wide, on the floor slightly behind and outside your hips.
- Raise your hips off the floor until your body is straight. keep your arms and legs straight and look up to the ceiling.
- Keep your entire body strong and form a straight line from your head to your heels.
- Squeeze your core and try to pull your belly button back toward your spine
- Hold this position for a set amount of time.
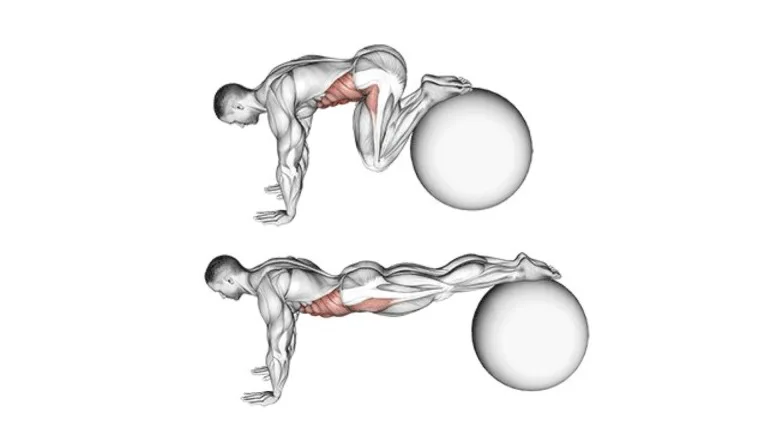
22. Stability Ball forearm Plank
The stability ball forearm plank intensifies core activation due to unstable surface demands. When the forearms are resting on the ball, it requires tighter pulling in of the abs, glutes, and legs to maintain proper body alignment.
The instability challenges the smaller stabilizing muscles, which are often overlooked in normal planks.
The Stability ball forearm plank is a challenging and effective core body exercise that forces you to pull your abs in, tighten your glutes and squeeze your legs to hold your body in a straight line.
This is an advanced plank variation that will challenge you beyond the standard planks.
- Level: Intermediate To Advanced
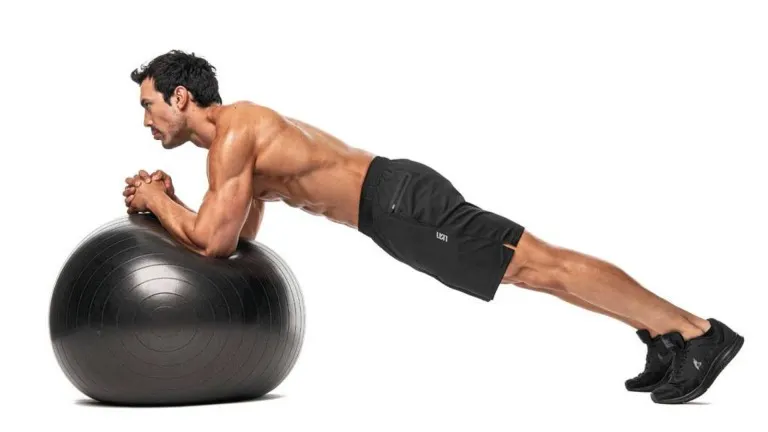
How To Do
- Get into a straight body position from your head to your heels.
- Place your forearms on the stability ball and feet on the floor.
- Stack your shoulders directly over your elbows, and press your forearms into the stability ball to support your shoulders.
- Maintain a tight core while squeezing through your quads and chest.
- Hold this position for a set amount of time.
23. Stability Ball forearm Side Plank
Stability ball forearm side plank exercises have become popular due to their multitude of benefits. They work the entire core, and they also increase spinal stability, balance, and coordination.
These plank variations are more difficult than regular side planks, so start with regular planks and only move on to these planks once you can do regular planks easily.
When you sit on the ball, the hips should be level or slightly higher than the knees.
- Level: Advanced
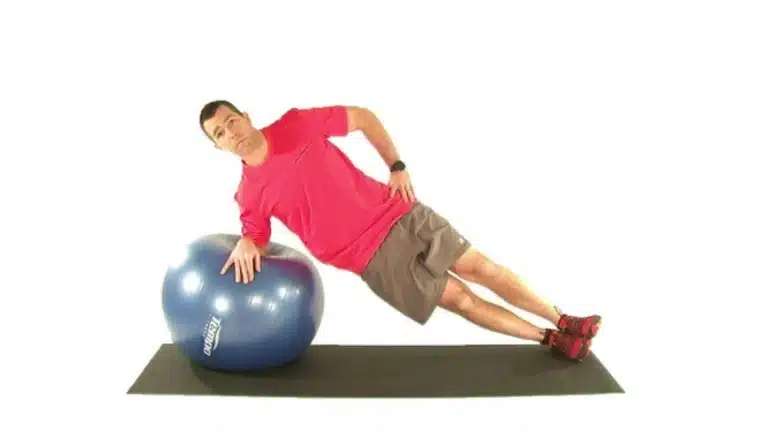
How To Do
- Place your elbow in the center of the stability ball and align your shoulder directly over your elbow.
- Press your forearm into the stability ball to support the shoulder joint.
- Stack your hips and feet on top of one another to create a straight line from your head to your heels, actively.
- Hold this position for a set amount of time.
24. Stability Ball Tuck
Stability Ball Tuck is also known as Stability-Ball Jackknife is a core stabilizing exercise that improves balance, strength, and flexibility throughout the hip and abdominal region.
The rolling plank exercise dynamically engages the triceps, quadriceps and core.
- Tricep activation is required to support the upper body while keeping a high plank form.
- The quads activate to keep the body steady against the instability of the rolling motion.
- This full-body variation challenges muscles to work harder compared to a standard plank hold.
- Level: Advanced
How To Do
- Stack your shoulders directly over your wrists; place the tops of your feet and shins on the stability ball.
- Maintain a straight body position from your head to your heels and a tight core
- Tuck your knees in toward your chest while rolling the ball forward.
- Hold the tucked position for a second, and then return to the starting position by extending your legs back.
- Repeat for the desired number of reps.
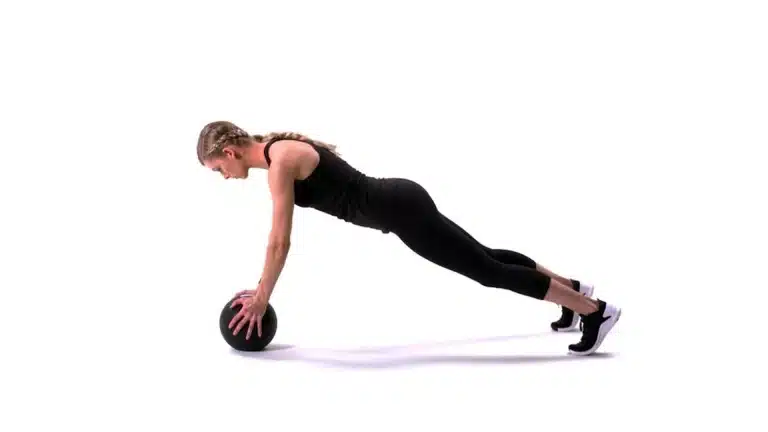
25. Medicine ball High plank
Medicine balls provide another unstable surface for you to work on. Performing planks on the medicine ball is a fast track to a strong, stable shoulder and a tight core.
It’s important to have a strong full plank in order to get to the medicine ball.
- Level: Advanced
How To Do
- Stack your shoulders directly over your wrists.
- Place your hands on either side of the medicine ball and press into your palms.
- Maintain a straight body position from your head to your heels with feet hip distance apart.
- Maintain a tight core while squeezing through your quads and chest to support the core.
- Hold this position for a set amount of time.
Frequently Asked Questions
What is plank exercise good for?
The plank is a great exercise for training the core, upper body, and lower body all at once. It strengthens your spine, your rhomboids, Deltoids and trapezius, and your abdominal and oblique muscles.
Which will naturally lead to a strong posture as they get stronger. A good posture can help with a number of health issues and prevent the development of others.
Do planks flatten the tummy?
Planks are a great technique for working out your entire body and to flatten your tummy. It burns more calories each session than other abdominal workouts like sit-ups.
How many calories does plank burn?
How many calories burned depends on your weight and how long you hold the plank. Typically, a 150-pound individual will burn about 3 to 4 calories a minute holding a plank.
What happens if I do a plank every day?
If you do planking every single day, it will help improve your body posture by strengthening your back, neck, chest, shoulder, and abdominal muscles.
How Long to Hold a Plank?
It’s better to hold a plank for 30 seconds with proper form than hold it for 3-5 minutes with poor form. Your goal should be to hold perfect form with maximum tension for as long as possible. Even then, your upper level will be about one minute or two if endurance is your goal.
Conclusion
Plank exercises are recommended for anyone interested in building core strength. It not only allows for targeted muscle development, but also provides overall core development.
It also works your muscles, from your shoulders to your legs, and is a true rock star of isometric exercises.
Planking is easy to do and requires no additional scientific details. If done consistently, the results will speak by themselves.
Thanks for reading, enjoy your Plank Workout!
STAY FIT, LIVE A HAPPY AND HEALTHY LIFE
Disclaimer:
The information contained in this article is for educational and informational purposes only and is not intended as health advice. We would ask you to consult a qualified professional or medical expert to gain additional knowledge, before choosing to consume any product or perform any exercise.
References
- Calatayud J, Casaña J, Martín F, Jakobsen MD, Colado JC, Andersen LL. Progression of core stability exercises based on the extent of muscle activity. Am J Phys Med Rehabil. 2017;96(10):694-6. doi:10.1097/PHM.0000000000000713
- A Murtezani, H Hundozi, N Orovcanec, S Sllamniku, T Osmani: A comparison of high intensity aerobic exercise and passive modalities for the treatment of workers with chronic low back pain: a randomized, controlled trial: PMID: 21602759
- D’Agata, Michele N. Staub, Jason P. Scavone, Daniel J. Kane, Gregory M. The Effect of External Dissociative Stimuli on Plank Duration Performed by Male Collegiate Soccer Players Journal of Strength and Conditioning Research: October 12, 2022 – Volume – Issue – 10.1519/JSC.0000000000004371
- Snarr, Ronald L. Esco, Michael R Electromyographical Comparison of Plank Variations Performed With and Without Instability Devices. Journal of Strength and Conditioning Research: November 2014 – Volume 28 – Issue 11 – p 3298-3305 doi: 10.1519/JSC.0000000000000521
- Byrne, Jeannette M.; Bishop, Nicole S.; Caines, Andrew M.; Crane, Kalynn A.; Feaver, Ashley M: Effect of Using a Suspension Training System on Muscle Activation During the Performance of a Front Plank Exercise
- Szafraniec R, Barańska J, Kuczyński M. Acute effects of core stability exercises on balance control. 3.Acta Bioeng Biomech. 2018;20(4):145-151.
- Bushman B PhD. Complete Guide to Fitness and Health 2nd Edition. American College of Sports Medicine. Human Kinetics. 2017.
- Chang W-D, Lin H-Y, Lai P-T. Core strength training for patients with chronic low back pain. J Phys Ther Sci. 2015;27(3):619-622. doi:10.1589/jpts.27.619

Manish brings over 10 years of hands-on experience in weight lifting and fat loss to fitness coaching. He specializes in gym-based training and has a lot of knowledge about exercise, lifting technique, biomechanics, and more.
Through “Fit Life Regime,” he generously shares the insights he’s gained over a decade in the field. His goal is to equip others with the knowledge to start their own fitness journey.